


Organizations today are looking for predictive analytics to guide them into the future. Every organization needs custom machine learning models built for their specific business needs. In financial services a valuable model predicts which borrower is most likely to default on his/her loan, which mutual product is suitable for a customer etc. But data engineers and data scientists face a number of challenges when building effective machine learning models such as poor quality of the training data set, long time spent on preparing data for training, and large quantities of data needed to train the models.
In this post, we will be exploring a financial service use case of evaluating loan information to predict if a borrower will default on a loan. The base data set was derived from loan data from LendingClub. This dataset contains lender data about loans granted to individuals. The data will then be enriched with unemployment data from Knoema on the Snowflake Data Marketplace. We use SnapLogic to transform and prepare the data that could later be used for building ML models.
Prerequisites
This post assumes you have the following:
- A Snowflake account
- Data in a table in Snowflake
- An Amazon Simple Storage Service (Amazon S3) bucket where SnapLogic can load the created ML model.
Set up the data source in SnapLogic
In this section, we cover setting up Snowflake as a data source in SnapLogic. This post assumes that you have access to SnapLogic. For more information about prerequisites, see Getting Started with SnapLogic.
Create a new pipeline
To create a pipeline, complete the following steps:
- In Designer, click on the [+] icon to the left of the tabs. The Configure New Pipeline dialog opens.
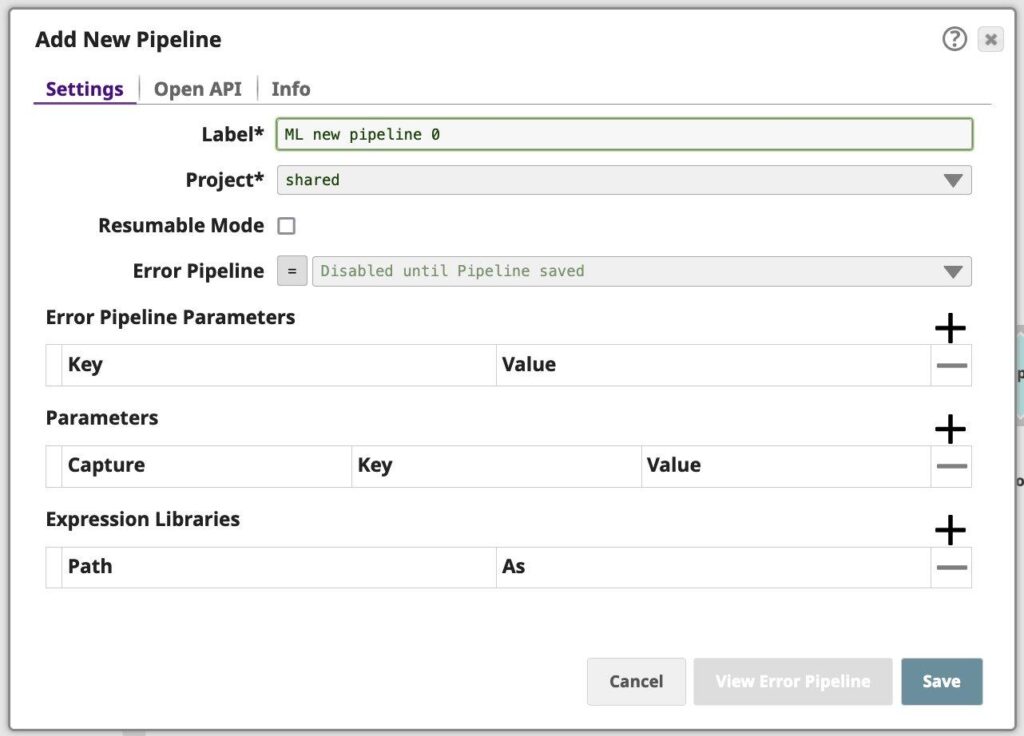
Figure 1: Pipeline property sheet - Modify the Label (pipeline name) and project for the pipeline if necessary. Unless otherwise noted, the names of any asset or project is limited to UTF-8 alphanumeric characters and these punctuation characters !”#$%&'()*+,-.:;<=>?@[\]^_`{|}~.
- If you know of parameters to define for this pipeline, you can do so now or later through the Pipeline Properties dialog.
- If you are using an expression library, you can add it now or later through the Pipeline Properties dialog.
- Click Save.
Add Snowflake as a data source in SnapLogic
Next, we add Snowflake as a data source.
- Drag a Snowflake – Select Snap to the Canvas and click the Snap to open its settings. Click the Account tab. You can now create a new one.
- Click Add Account in the Account Reference dialog.
- Select the Location in which you want to create the account, select Snowflake S3 Database Account as the account type, and click Continue. The Add Account dialog associated with the account type appears.
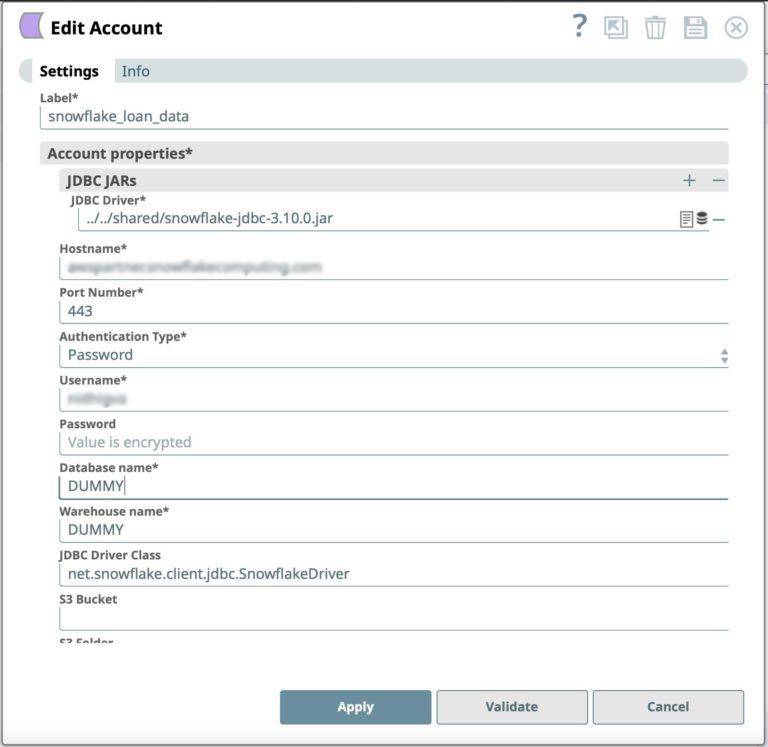
Figure 2: Snowflake Snap account definition - Click Validate to verify the account, if the account type supports validation.
- Click Apply to complete configuring the Snowflake account.
- Go to Settings tab
- We select the table in which we have already loaded loan data from Lending Club.

- For the Snowflake account enter:
- Schema name
- Table name
- Set Limit rows to 1000
- Press Save icon
Add ML Snaps to pipeline for Machine Learning using SnapLogic
SnapLogic Data Science includes the following ML Snap Packs to accelerate ML projects.
- ML Data Preparation Snap Pack – The ML Data Preparation Snap Pack automates various data preparation tasks for a machine learning model. SnapLogic Data Science simplifies the process of data preparation and feature engineering using visual interface.
- ML Core Snap Pack – The ML Core Snap Pack accelerates the building, training, and testing of your machine learning model. Leverage the ML Core Snap Pack to streamline the model training and evaluation phase of the machine learning lifecycle.
- ML Analytics Snap Pack – The ML Analytics Snap Pack creates better training datasets for your machine learning models faster. Gain insights from your data fast with the ML Analytics Snap Pack.
- Natural Language Processing Snap Pack – The Natural Language Processing Snap Pack performs operations in natural language processing.
Drop rows with missing values
The first step we want to perform is to process missing values in a dataset by dropping or imputing (replacing) values.
- Drag the Clean Missing Values snap to the Canvas and click the Snap to open its settings.
- Add columns REVOL_UTIL to drop rows from incoming dataset if the value is missing
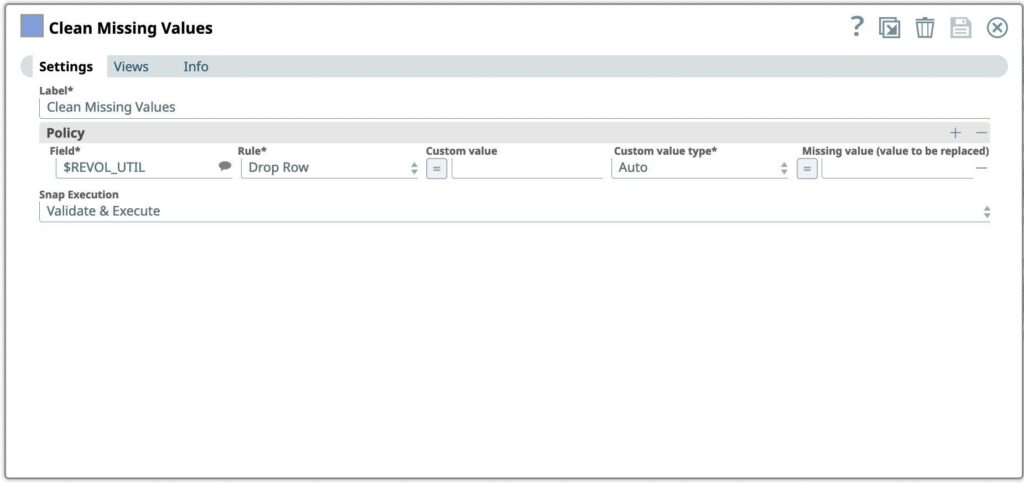
Figure 4: Clean missing values Snap settings
Transform data
Next we want to transform incoming data using the given mappings and produce new output data. This Snap evaluates an expression and writes the result to the specified target path.
- Drag the Mapper snap to the Canvas and click the Snap to open its settings.
- Looking through the columns, we identify that MNTHS_SINCE_LAST_DELINQ and MNTHS_SINCE_LAST_RECORD should most likely be represented as a number type, rather than string.
- Looking through the data, we can see that the fields EMP_TITLE, URL, DESCRIPTION, and TITLE will likely not provide value to our model in our use case, so we drop them.
- Next, we look for columns that are string data that can be formatted to be more beneficial to use later. Looking through our dataset, we can see that INT_RATE might be useful in a future model as float, but has a trailing character of %. Before we can use another built-in transformation (parse as type) to convert this to a float, we must strip the trailing character.
- We then update the string value in TERM column, to replace the space with ‘_’.
- We create a new boolean column LOAN_STATUS based on LOAN_DEFAULT.
- Click on the [+] sign next to Mapping table to add a new expression. Transformation to be applied to convert data in columns:
Expression* Target path parseFloat(+$MNTHS_SINCE_LAST_DELINQ) MNTHS_SINCE_LAST_DELINQ parseFloat(+$MNTHS_SINCE_LAST_RECORD) MNTHS_SINCE_LAST_RECORD parseFloat(+$INT_RATE.replace(“%”, “”)) $INT_RATE_PERCENTAGE $TERM.replace(” months”, “_months”) $TERM $EMP_TITLE $URL $DESCRIPTION $TITLE $MTHS_SINCE_LAST_MAJOR_DEROG $LOAN_DEFAULT == 1 ? true:false $LOAN_DEFAULT_STATUS - Press Save icon
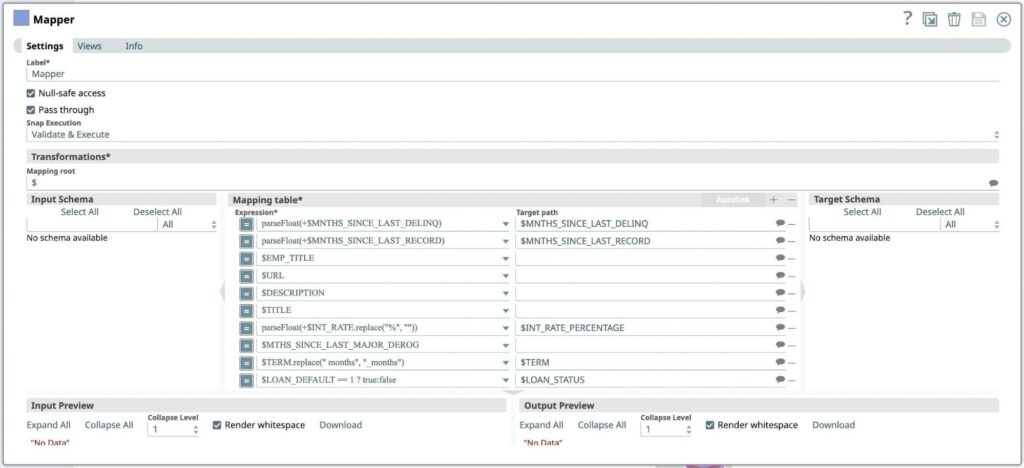
Figure 5: Mapper Snap settings
Get Labor Data from Snowflake Marketplace
We will now add labor data from Snowflake Marketplace that can be helpful for improving ML models. It may be good to look at employment data in the region when analyzing loan defaults. We will get Knoema – Labor Data Atlas from Snowflake Marketplace to the Snowflake Database where the load data already exists.
Next, we add Snowflake as a data source.
- Drag a Snowflake – Execute Snap to the Canvas and click the Snap to open its settings. Click the Account tab.
- Select the Account created in previous step from the Account Reference dialog.
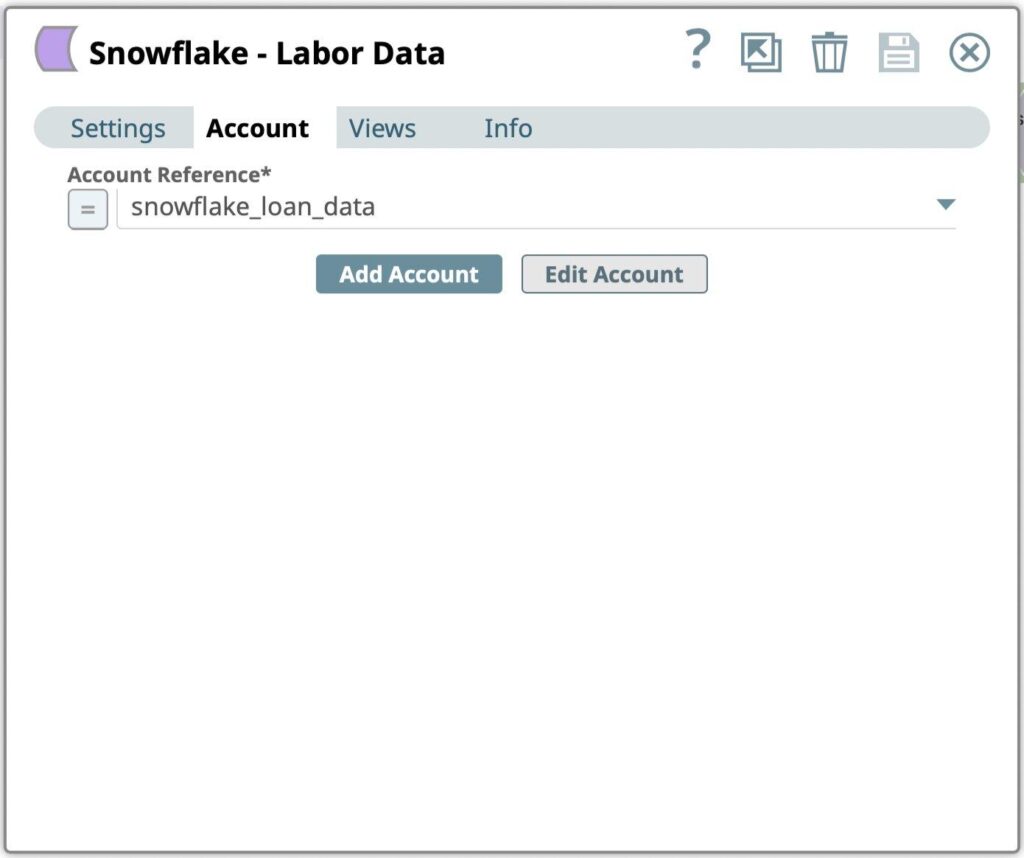
Figure 6: Snowflake Select Snap account selection - Go to Settings tab
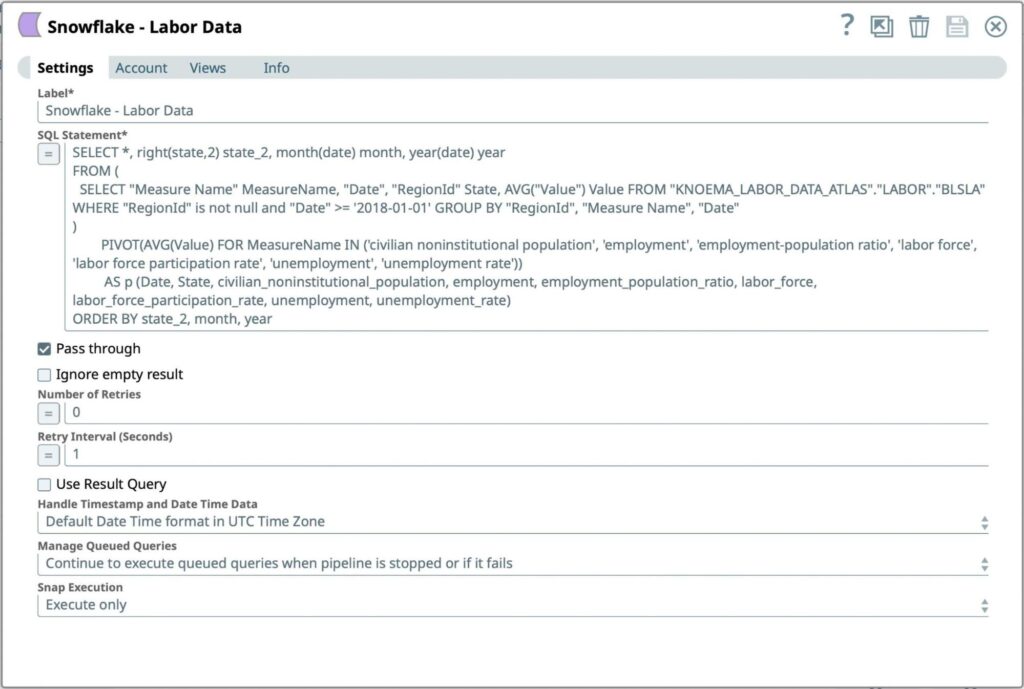
Figure 7: Snowflake Select Snap Settings - Enter the SQL query to be executed to retrieve formatted Labor Data from Snowflake account:
- SQL Statement
- Press Save icon
Profile data
- Drag the Copy snap to the Canvas. Leave it to the default settings.
- Drag the Profile snap to the Canvas. This is helpful in deriving a statistical analysis of the data in datasets.
Perform One Hot Encoding
Next, we want to look for categorical data in our dataset. SnapLogic has the snaps to encode categorical data using both one-hot encoding and Integer Encoding. Looking at our dataset, we can see that the TERM, HOME_OWNERSHIP, and PURPOSE columns appear to be categorical in nature.
- Drag the Categorical to Numeric snap to the Canvas and click the Snap to open its settings.
- In settings, under Policy, enter these column names as Field and select One Hot Encoding as Rule.
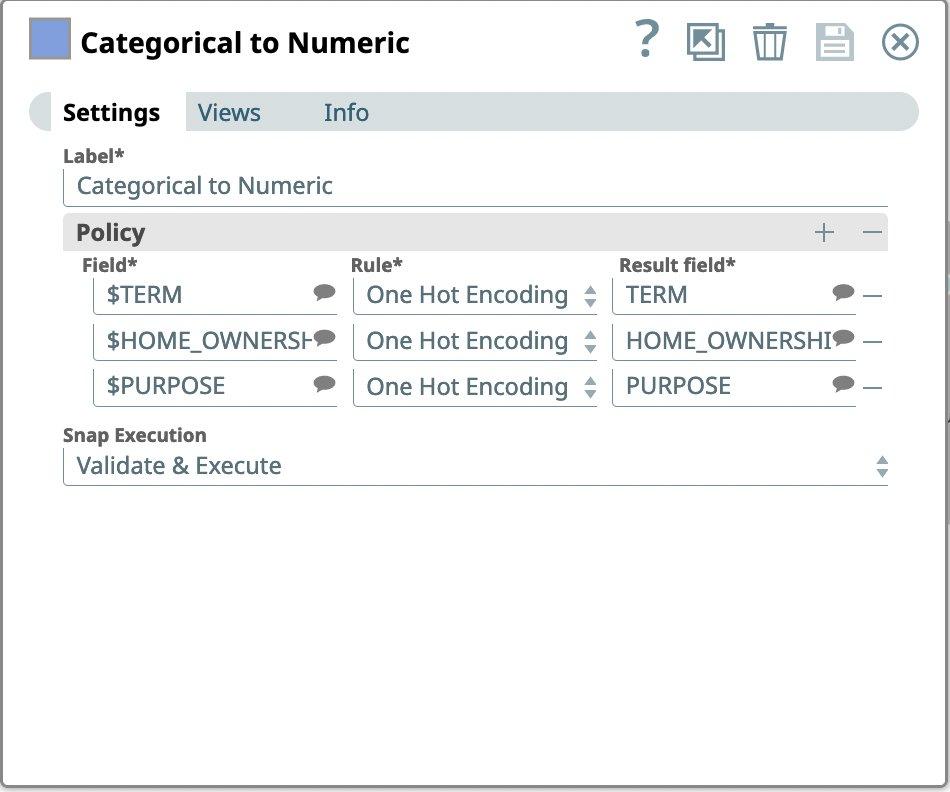
Figure 8: Categorical to Numeric Snap settings
Load the prepared data to Snowflake
Next, we add Snowflake as a data source.
- Drag a Snowflake – Bulk Load Snap to the Canvas and click the Snap to open its settings. Click the Account tab.

Figure 9: Snowflake Bulk Load Snap account settings - Select the Account created in previous step from the Account Reference dialog. You can also create a new account if you want to store the result in a different Snowflake database and warehouse.
- Go to Settings tab
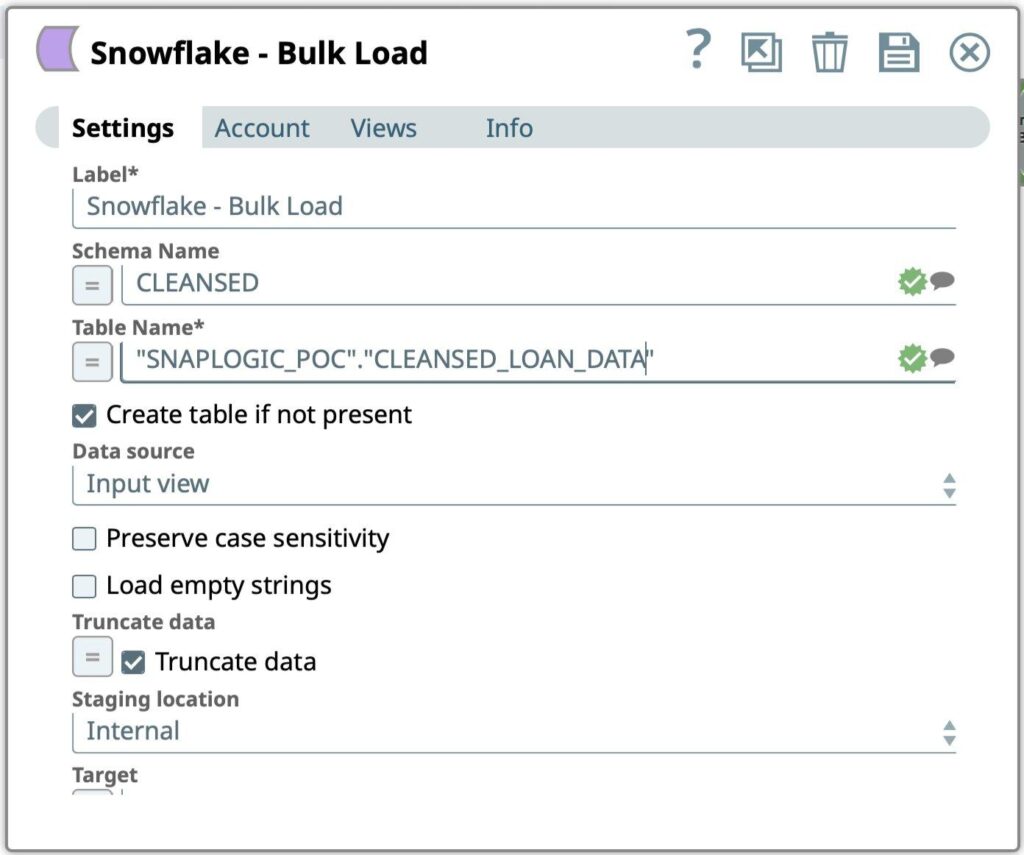
Figure 10: Snowflake Bulk Load Snap settings - Enter the SQL query to be executed to retrieve formatted Labor Data from Snowflake account:
- Schema Name
- Table Name
- Press Save icon
Below is the screenshot of the end to end Data Preparation Pipeline created in SnapLogic.
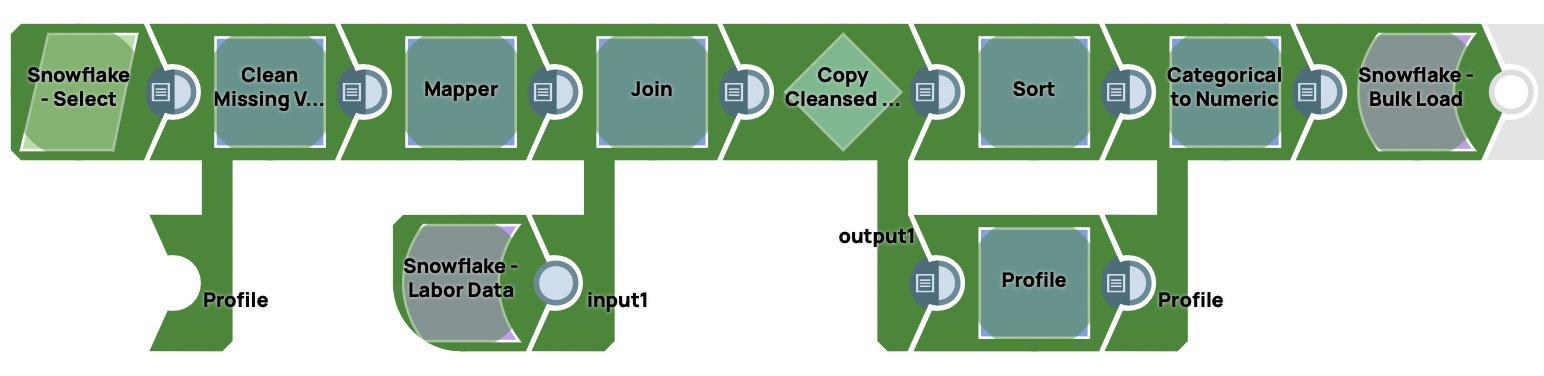
When the pipeline is executed it will load the data into Snowflake. It can be triggered or scheduled.
Conclusion
In this post, we covered setting up Snowflake as a data source for SnapLogic to build a Model for Loan Prediction Pipeline, including configuring Snowflake endpoint in SnapLogic, building a pipeline with machine learning Snaps, fetching data from Snowflake Marketplace, and finally loading the prepared data back into Snowflake. I hope you have followed along and built a machine learning model for your specific business needs using this easy to use process in SnapLogic.