


This blog post is part two in a series that aims to present a set of challenges companies face related to modern integration development and how you can address those challenges easily with SnapLogic. You can find part 1 in this series here.
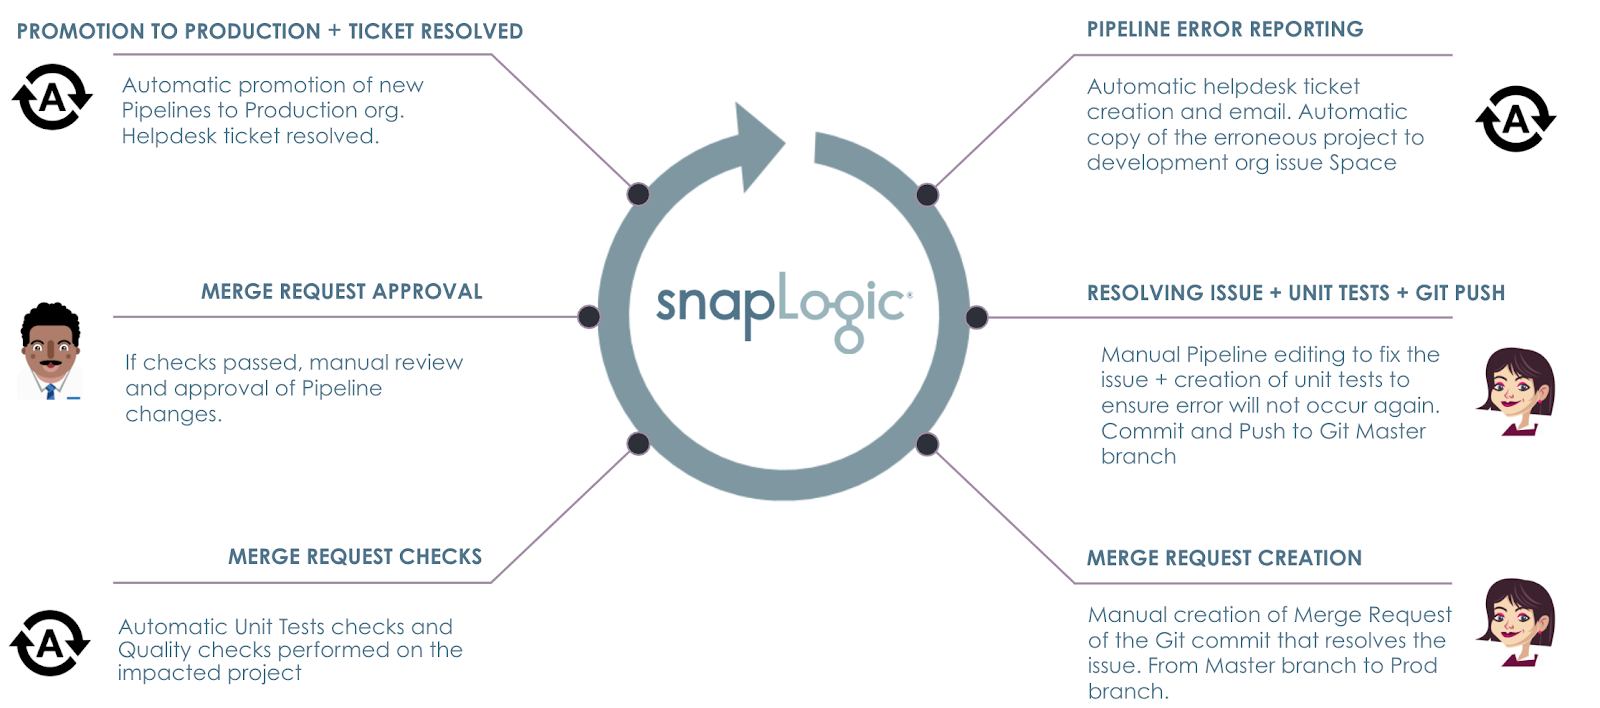
In this, you will learn how SnapLogic platform helps you efficiently
- execute quality checks with unit tests and policy compliance
- manage merge request
- promote changes to production and notify stakeholders
Merge Request Creation
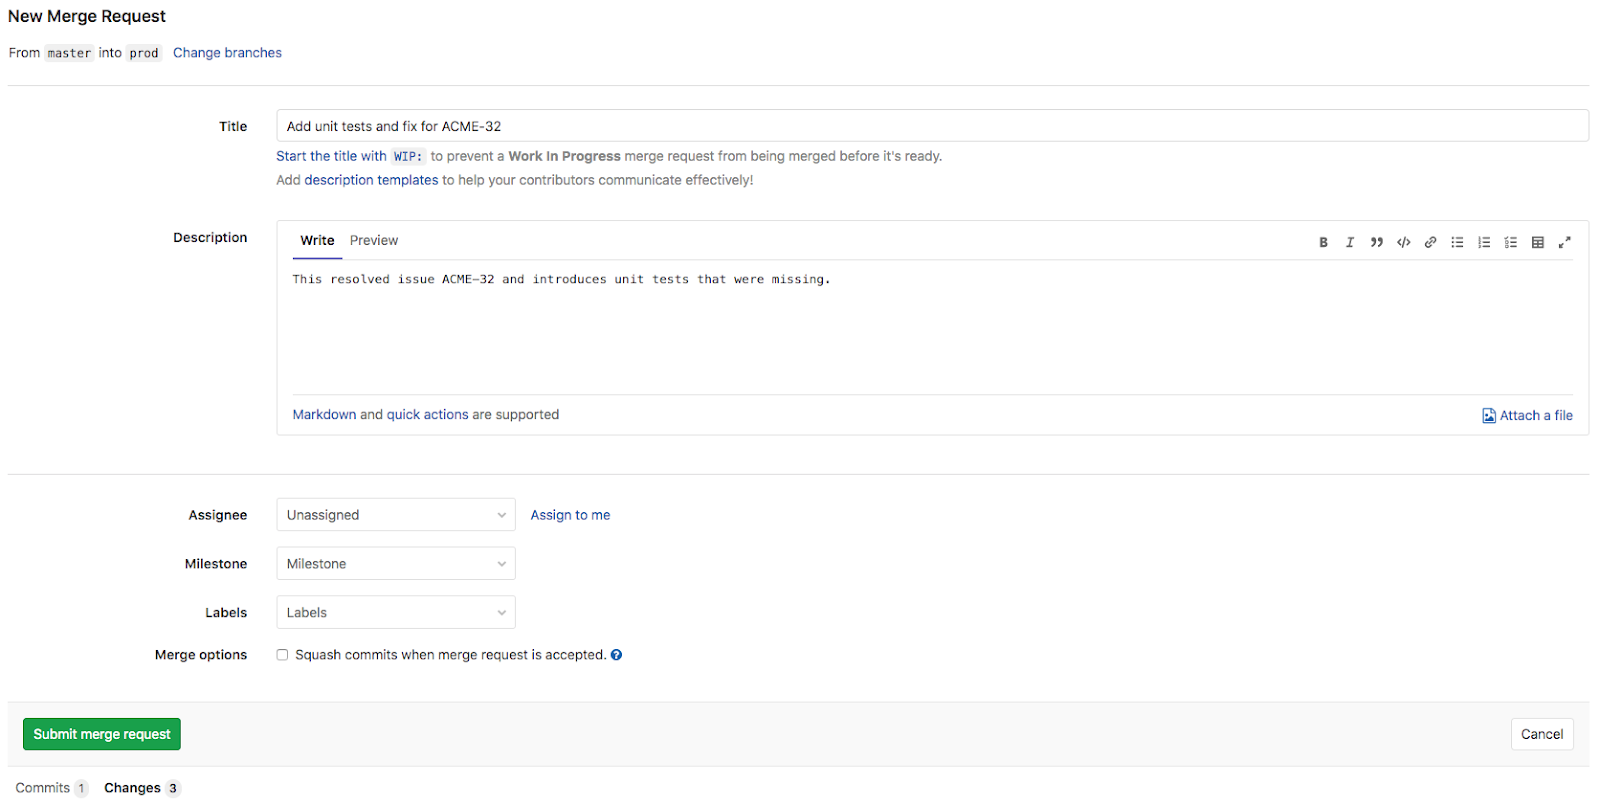
After an Integrator has identified a fix to resolve issues, as a last step, the Integrator will now create a Merge Request in GitLab to ask for the changes to be merged into the Prod branch from the Master branch.
Note: This blog post moves directly from the Master branch to the Prod branch – effectively promoting the assets from the development environment to the production environment. This does not necessarily reflect best practices for all customers’ organization structures and policies.
Merge Request Checks
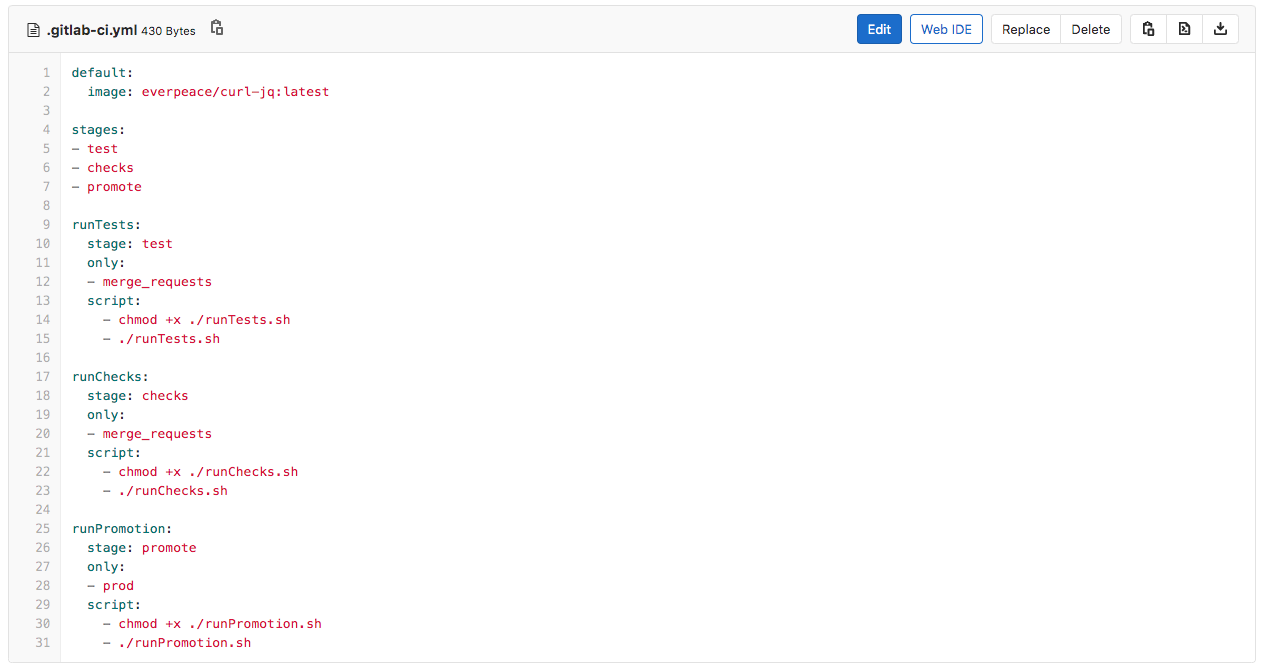
Upon the creation of the Merge Request, GitLab will automatically run a CI/CD Pipeline that comprises of two jobs; runTests and runChecks. To have this working, the CI/CD engineer (please refer to the part 1 in this series) has created a GitLab CI/CD configuration file. The CI/CD configuration file (as seen below) performs the following tasks:
- runTests
- Only runs for Merge Requests
- Runs in the first stage called test
- Executes the runTests.sh script
- runChecks
- Only runs for Merge Requests
- Runs in the second stage called checks
- Executes the runChecks.sh script
- runPromotion
- Only runs for the Prod branch changes
- Runs in the third stage called promote
- Executes the runPromotion.sh script
Note: While this blog post uses GitLab’s features for CI/CD, it is important to understand that due to the REST and JSON support of the SnapLogic platform, creating similar jobs in other tools like Azure DevOps, GitHub, Bamboo, etc. follows the same logic and technicalities.
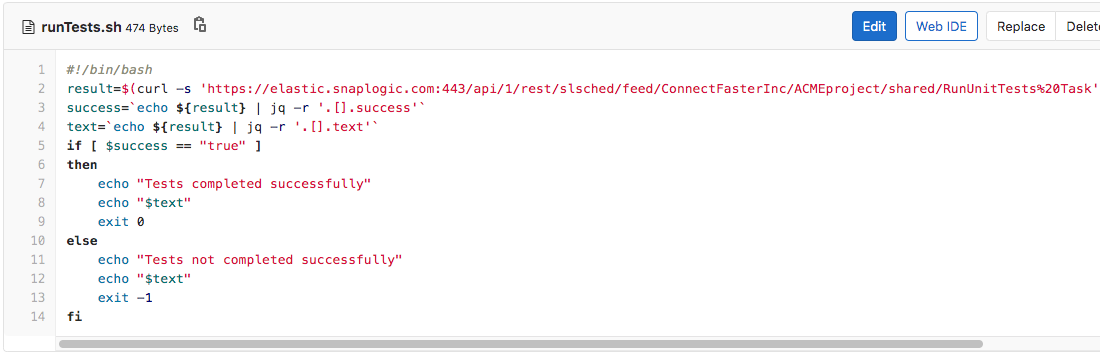
As indicated, the CI/CD engineer has configured only two jobs to run upon the creation of a Merge Request: runTest and runChecks, and they will be run in that order. Let’s first investigate what happens when the first job (runTests) is run and the runTests.sh script (shown below) is executed. First, it executes a SnapLogic Triggered Task named RunUnitTests Task. It then checks if the result was successful or not, and based on the outcome, it will either pass or fail the entire CI/CD Pipeline.
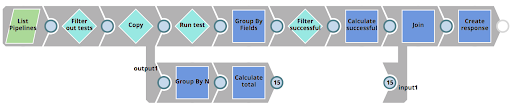
The RunUnitTests Task executes a Pipeline called RunUnitTests as shown below. This Pipelines does the following
- Lists all Pipelines in the impacted project
- Filters out Pipelines that are not subject to unit testing
- For each Pipeline, executes the 01_UnitTestingTemplate Pipeline using the Pipeline Execute Snap (labelled as Run test)
- Filters out successfully tested results
- Compares the number of successful tests to the number of total tests and then creates a response back to the client – indicating the number of completed vs failed tests.
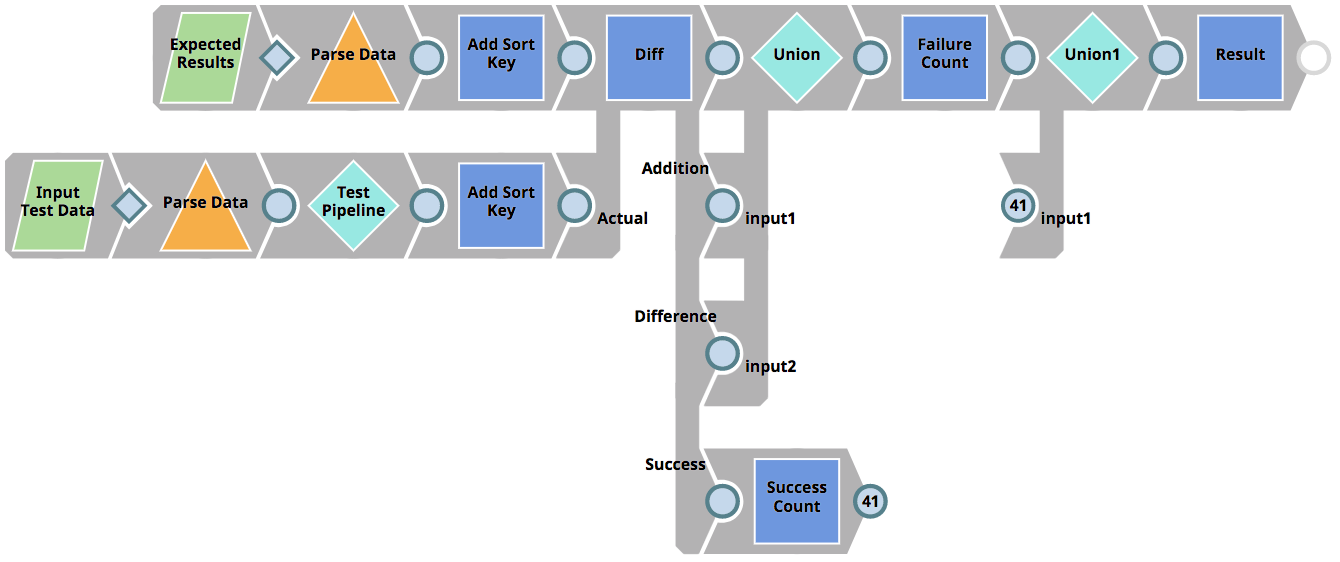
As mentioned above, the RunUnitTests Pipeline figures out which Pipelines to run tests for, as well as sends the tests result back to the client, but it does not execute the tests themselves. Instead it invokes the 01_UnitTestingTemplate Pipeline for each Pipeline subject to test. This Pipeline can be seen below. It does the following.
- Reads the expected results (parameterized as <Pipeline_name>_result.json) – in our case from the file CustomerToSalesforce_result.json (see previous chapters).
- Read the input test data (parameterized as <Pipeline_name>_input.json) – in our case from the file CustomerToSalesforce_input.json (see previous chapters).
- Executes the target Pipeline (parameterized as <Pipeline_name>_target) – in our case from the file CustomerToSalesforce_target (see previous chapters) using the Pipeline Execute Snap (labelled as Test Pipeline)
- Uses the Diff Snap to compare the expected result data with the actual results based on the Pipeline that was executed (the CustomerToSalesforce_target with the CustomerToSalesforce_input.json test data). The Diff Snap outputs each row as either deletion, insertion, modified or unmodified. Only if all rows are unmodified (view labelled as Success) – the test will be considered as passed.
- Returns the result of the individual test to the parent Pipeline (RunUnitTests)
The above process and Pipelines have been agreed by the Test lead and CI/CD engineer as well as the entire integration team based on the requirement and policies in ACME. There might be other tests as well – such as performance tests and functional tests that are out of scope for this post.
Note: You will see the result of both the unit tests and quality checks later on in this blog post.
If all the tests pass and the runTests.sh script is successful, the next stage and job (runChecks) in the GitLab CI/CD configuration is executed – invoking the runChecks.sh script. The runChecks job has been agreed between the CI/CD engineer and the Security lead. The Security lead is requiring that a set of rules and policies should be applied to the Pipelines and other SnapLogic assets that are to be put into production. These policies could include
- Naming conventions on Pipelines, Snap labels or other properties
- Forbidden Snaps
- Forbidden settings within Snaps
For ACME, the Security lead is providing the below policies (defined in JSON format)
[
{
“class”: “com-snaplogic-snaps-transform-recordreplay”,
“conditional”: false
},
{
“class”: “com-snaplogic-snaps-binary-aesencrypt”,
“conditional”: true,
“settings”: [
{
“name”: “cipherMode”,
“allowedValue”: “CBC”
}
]
}
]
In effect, the intention of the above policy is to
- Avoid any use of the Record Replay Snap in the Production org. ACME is a heavily audited company that can not allow any customer data to be saved down to a persistent storage.
- Avoid use of the AES Encrypt Snap if the cipher mode setting is not set to CBC. ACME has a company wide security policy to only use CBC mode when encrypting.
This policy means that any Record Replay Snaps or any AES Encrypt Snap (that does not have CBC as cipher mode) will not be allowed in production. To achieve this, the runChecks.sh script will call a SnapLogic Triggered Task to check the impacted Pipelines against the policy document and fail the job if it does break the policies. The runChecks.sh script can be seen below.
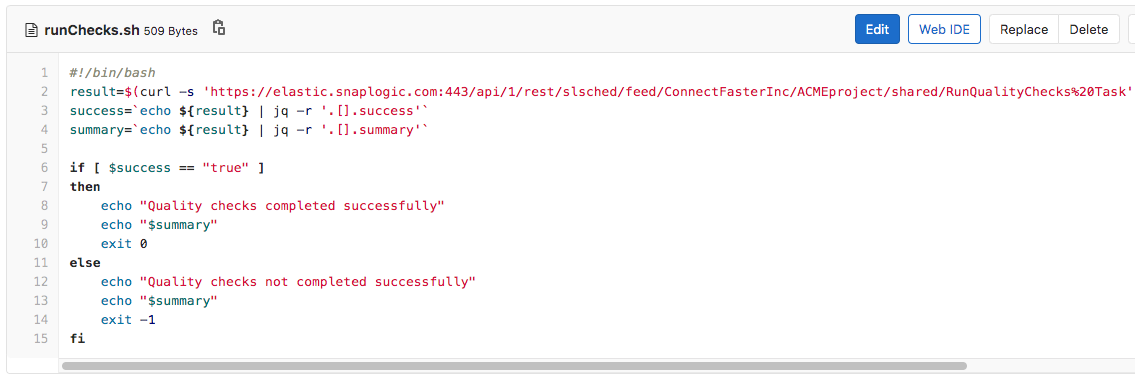
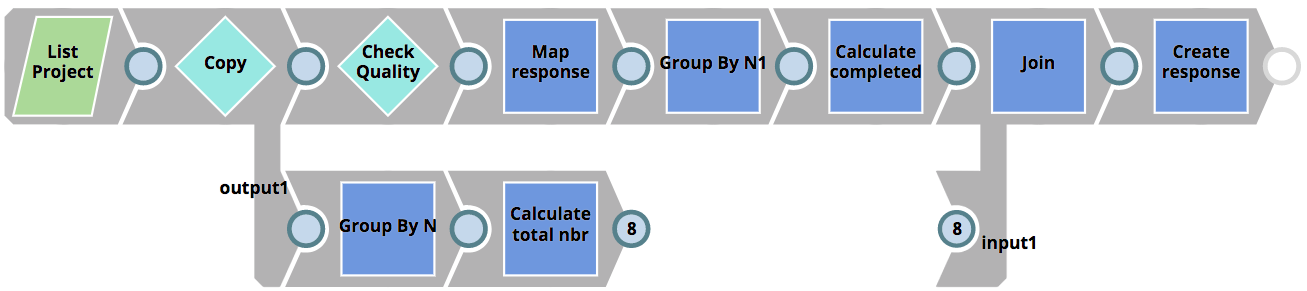
The RunQualityChecks Triggered Task invoked by the runChecks.sh script executes the RunQualityChecks Pipeline that can be seen below. It’s logic resembles that of the RunUnitTests Pipeline shown earlier.
- Lists all Pipelines in the impacted project
- For each Pipeline, executes the 01_QualityCheck Pipeline using the Pipeline Execute Snap (labelled as Check Quality)
- Calculated the number of successful Pipelines
- Compares the number of successful checks to the number of total checks and then creates a response back to the client – containing the number of completed vs failed checks as well as the reason why the tests failed.
Similarly to our unit test Pipelines, the RunQualityChecks Pipeline figures out which Pipelines to run checks for, as well as sends the checks result back to the client, but it does not execute the quality checks themselves. Instead it invokes the 01_QualityCheck Pipeline for each Pipeline subject to quality checks. This Pipeline can be seen below. It does the following.
- Reads the Pipeline subject to quality checks
- Extracts all the Snaps used in the Pipeline. As SnapLogic is a JSON native platform, the Snaps and their properties are simply JSON objects.
- Reads and parses the ACME Policy JSON document provided by the Security lead.
- Join the Snaps with the Snaps in the policy to make sure only Snaps that have a match in the policy are checked.
- Checks if a Snap is allowed or not
- Checks if a Snap is conditionally allowed or not (e.g the settings are allowed)
- Creates a response back to the parent Pipeline with the results

If the quality checks pass (after the unit tests have passed), the Merge Request is ready to be approved.
Merge Request Approval
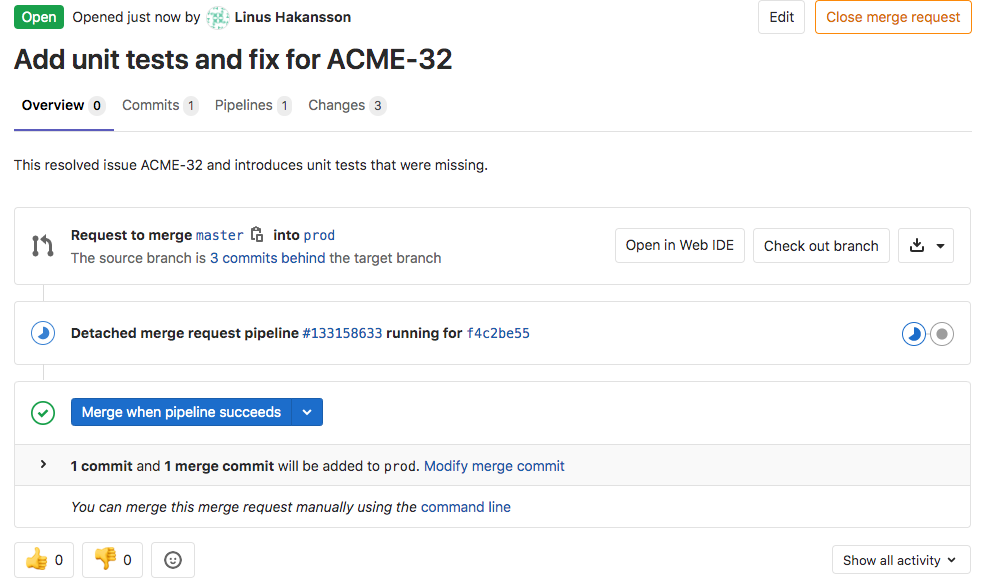
The Architect will now be responsible for reviewing the Merge Request. If the changes make sense and the automatic unit tests and quality checks have passed, the Architect will approve and merge the request. He starts with opening up the Merge Request (seen below) just raised to see the summary of its contents
- Title of the Merge Request has been defaulted to the title of the single Git commit
- The Merge Request contains a single commit
- The single commit contains three changes; 1 changed file and 2 additions
- A merge request CI/CD pipeline is currently running (indicated by the blue progress icon)
- There is an option to merge the request when that pipeline has succeeded
Before reviewing the Merge Request changes, the pipeline completes with the below summary of the stages/jobs. As can be seen, the runTetsts job completed successfully. However, the subsequent runChecks job did not. We can dive into both of them to understand what happened.
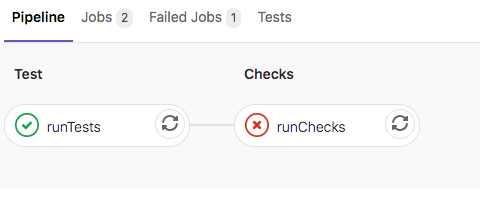
Firstly, let’s open the runTests job to see the summary. As you can see below, the tests completed successfully.

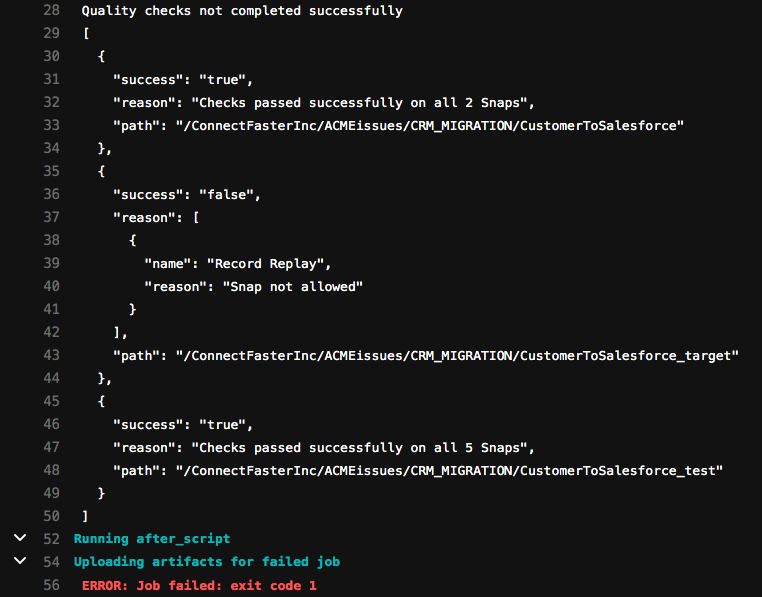
Secondly, let’s review the runChecks job summary. In contrast to the runTests summary, this job is not complete. It says that the quality checks did not complete successfully. Of the three Pipelines checked (CustomerToSalesforce, CustomerToSalesforce_target and CustomerToSalesforce_test), one of the Pipelines failed – the CustomerToSalesforce_target Pipeline. If you refer to the design of that Pipeline shown earlier in this post, it can be seen that we used a Record Replay Snap in order to help us during development. However, as per the policies supplied by the Security lead, that is not allowed in production.
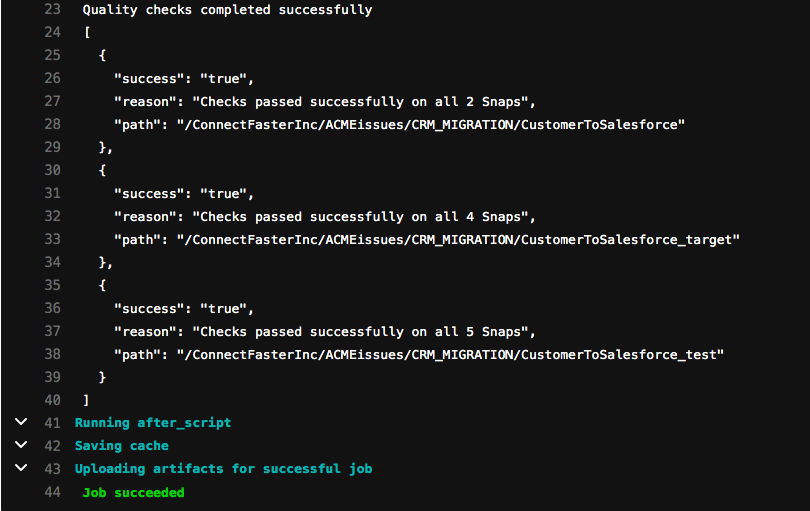
The Architect can now sync with the Integrator to go through the issue – if not already picked up by the Integrator through an alert. As the change process has already been covered in this blog post, we will now assume that a new iteration has been done with an amended commit and updated Merge Request, removing the Record Replay Snap. The output of the runChecks job is now like below.
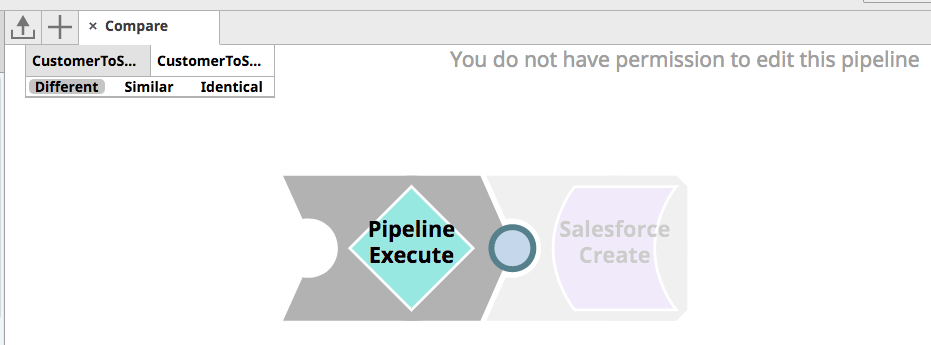
Finally, the Architect can review the changes using two methods. In the first method, he can review the changes in the JSON structure between the two versions of the CustomerToSalesforce Pipeline, understanding what Snaps and properties were changed. Secondly, he can use the SnapLogic Compare Pipeline feature to get a visual comparison of the old and new version of the Pipeline. As seen in the picture below, he can see that a Pipeline Execute Snap was added to abstract the transformation and validation logic from the Pipeline itself to enable unit testing.
After reviewing the changes and confirming that the unit tests and quality checks passed, the Architect is comfortable with approving the changes and merging the Merge Request. As a result, the latest changes are now pushed to the Prod branch.
Promotion to Production + Ticket Resolved
As the last step as part of the ACME end-to-end scenario, the new Pipeline changes merged to the Prod branch should now automatically be promoted to the SnapLogic Production environment. As mentioned earlier, moving directly from a development to a production environment might not be the best approach as it is typically recommended to use a staging environment like a QA or Test before. However for the purposes of this blog post, we are moving from development to production directly. When the changes have been moved to production, we also want to automatically close the ticket, highlighting how it was resolved. All these steps have been automated as per agreement between the CI/CD engineer and Operations.
Referring back to the Merge Request Checks chapter, the GitLab pipeline had a third job called runPromotion. As a refresher, it does the following:
- runPromotion
-
- Only runs for the Prod branch changes
- Runs in the third stage called promote
- Executes the runPromotion.sh script
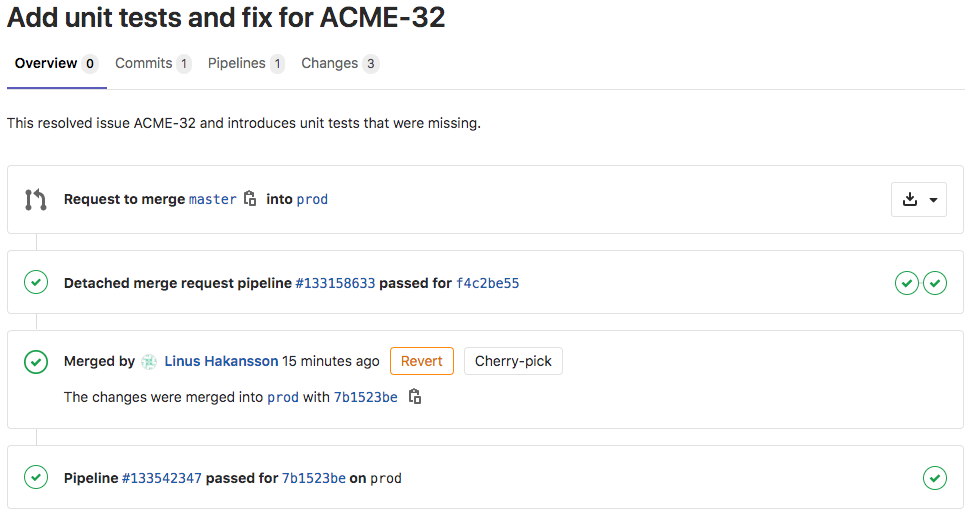
As the Merge Request merge action taken by the Architect moved the changes to the Prod branch, the runPromotion job will execute automatically. When it is run, the complete Merge Request flow will look like below. The following steps can be seen in the image below.
- A request to move changes between Master and Prod branch was created
- A CI/CD pipeline passed (this was running unit tests and quality checks)
- The request was approved and merged by the Architect
- Another CI/CD pipeline passed (this is the promotion pipeline)
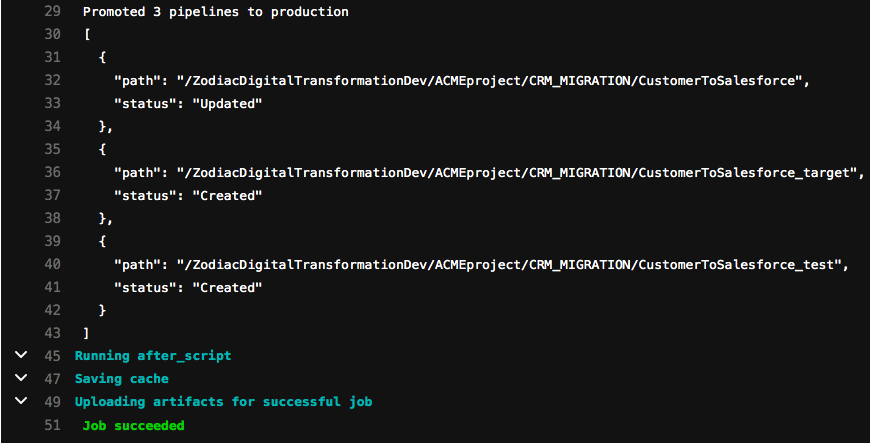
Let’s check the output of the final promotion job that runs the runPromotion.sh script. As you can see below, the job successfully promoted the 3 Pipelines to the Production org. One of them was Updated while the other two did not exist and had to be Created. If this was a new set of Pipelines developed, all the results would have said Created.
So how did the Pipelines actually move from the development to the production environment? Let’s take a look at the contents of the runPromotion.sh script. It executes the RunPromotion Triggered Task and passes the commit message of the actual commit – in our case this commit message includes the JIRA ticket reference number.

The RunPromotion Triggered Task invokes the RunPromotion Pipeline that can be seen below. It does the following.
- Reads the current space (ACMEissues) in the development environment (where the new Pipelines reside) as well as the current project (CRM_MIGRATION)
- If that space and project does not exists in the production environment, it creates them
- Lists all Pipelines in the source project and calls the 01_PromotePipeline Pipeline for each Pipeline, using the Pipeline Execute Snap (labeled as Promote Pipeline)
- Creates a response back to the client if the 01_PromotePipeline Pipeline succeeds
- Transitions and updates the related JIRA ticket (extracted using a regular expression from the commit message from the GitLab commit)
- Sends out an email to Operations with the result

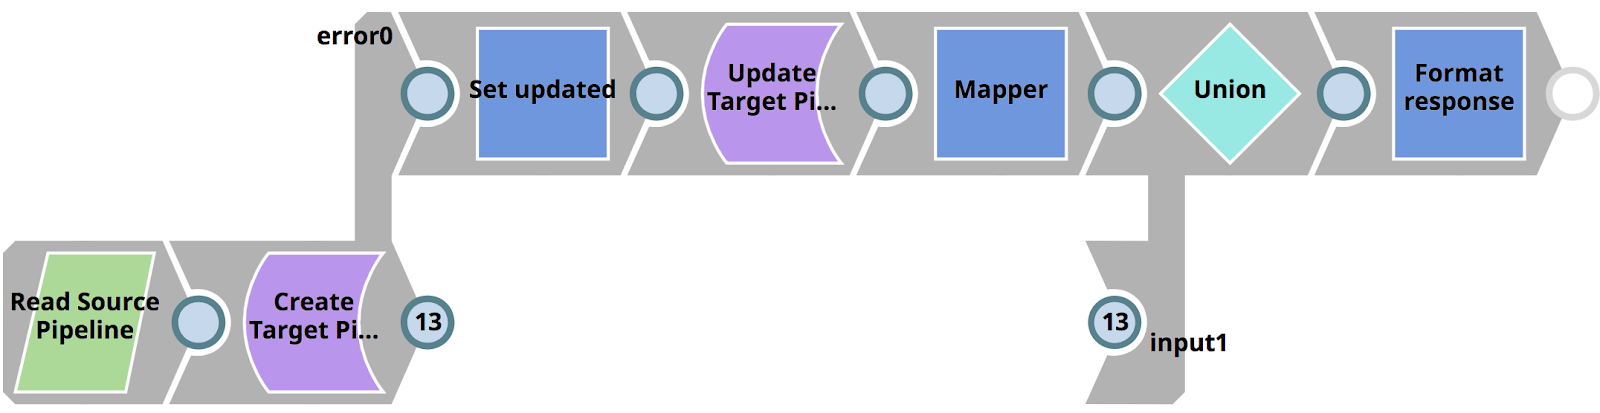
As mentioned, for each Pipeline found in the source project, it calls 01_PromotePipeline. This Pipeline can be seen below and does the following
- Reads the Pipeline from the source project (in the development environment)
- Creates it in the target project (in the production environment) if it does not exist
- Or updates it in the target project (in the production environment) if it does exist
- Formats a response back to the parent Pipeline
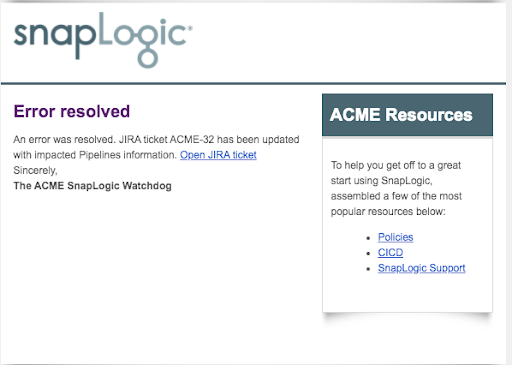
With that, the changes have now been promoted to the production environment and the JIRA ticket has been closed. The below email has automatically been sent out to the Operations, with a link to the updated ticket.
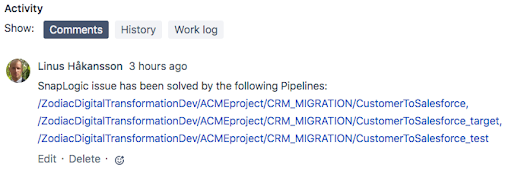
As part of SnapLogic moving the issue to the Done state, a comment is automatically added to the ticket, indicating which Pipelines were involved in resolving the issue.
Summary
This blog post demonstrated how a fictional ACME company and personas could efficiently use third-party automation, versioning and helpdesk tools to provide an end-to-end SnapLogic Pipeline lifecycle management.
Considering that this is a long post, here are the topics and processes we covered in this blog post.
With SnapLogic platform, you can
- Capture Production Pipeline errors automatically
- Raise helpdesk tickets automatically with detailed information about the error
- Have Integrators and architects work collaboratively to version control and review the work across multiple SnapLogic environments
- Automate unit tests and quality checks to adhere to the company’s policies
- Automate migrations and promotions to ensure that the right assets move across the company’s SnapLogic environments
- Leverage a REST and JSON native platform helps to automate and govern every aspect of the lifecycle
The personas, processes, policies and tools involved in this blog post can be easily modified to meet any enterprise’s needs. If your organization doesn’t already have access to the SnapLogic Intelligent Integration Platform, sign up for a free-trial today!