


Introduction
Many of SnapLogic customers combine the SnapLogic Intelligent Integration platform with a wide variety of tools to achieve end-to-end control of the lifecycle of pipelines and other assets. Such processes can include automated helpdesk ticket generation on errors, manual and automated reviewal processes through version control systems, continuous integration and continuous deployment pipelines, and unit tests & company compliance and quality checks.
As companies have different policies, requirements, processes, and toolchains, there is no single recommendation or solution to achieve end-to-end lifecycle management and automation that applies to all.
This blog post series aims to present a set of challenges companies face related to modern integration development and how you can address those challenges easily with SnapLogic. Specifically, this series will also describe typical user personas involved with or around your integrations and how the combination of SnapLogic and other tools can help automate and govern the lifecycle of these integrations.
In part 1, you will learn how SnapLogic platform
- automatically capture errors,
- does error reporting by raising tickets automatically with detailed error information and
- help Integrators and test teams resolve issues with a focus on reuse and ease of use.
Personas
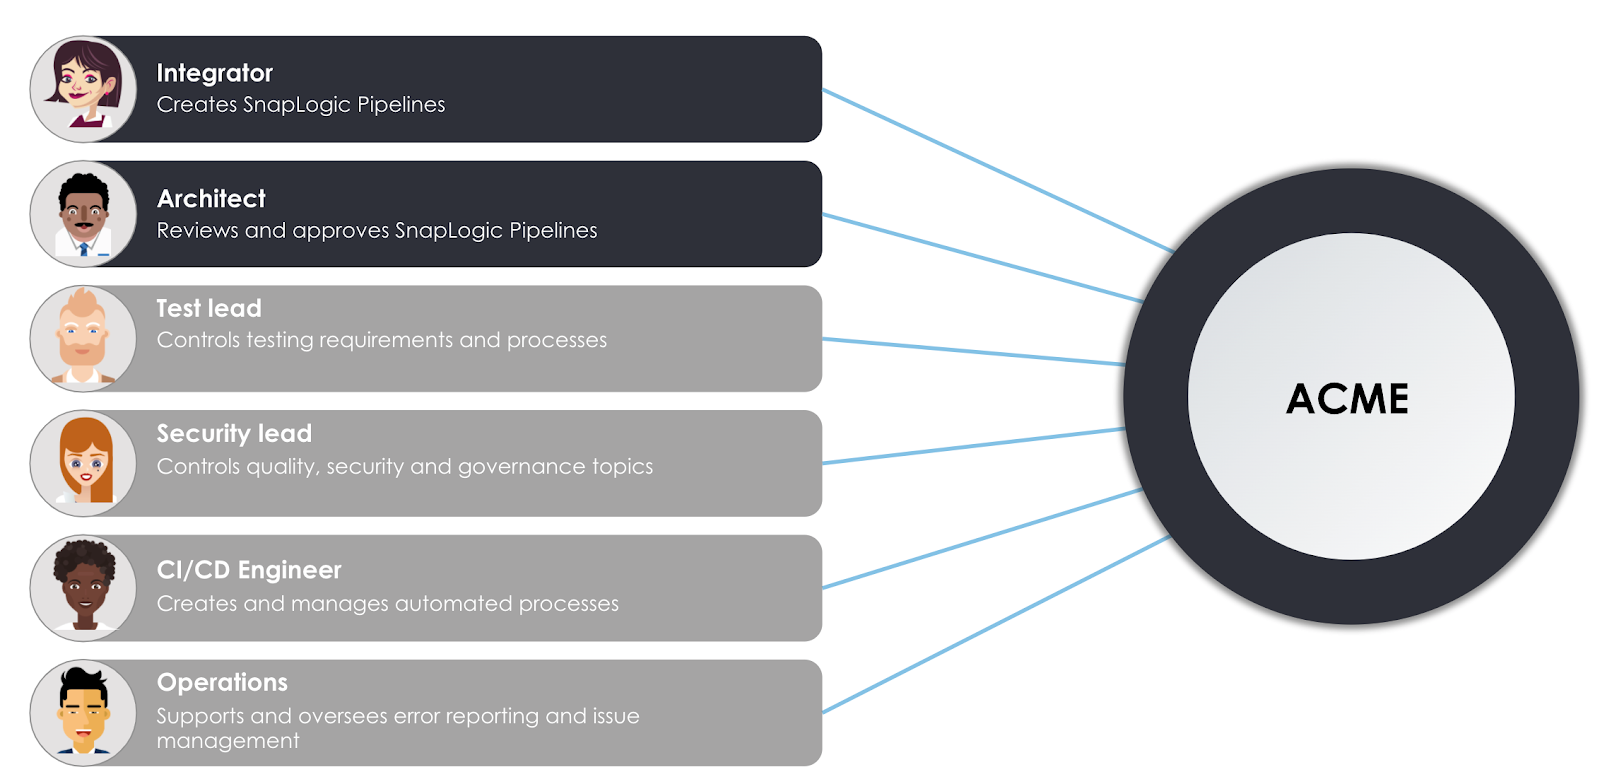
Consider above user personas involved in the fictional ACME company.
- The Integrator is responsible for working with the SnapLogic Intelligent Integration platform to design and create pipelines to support the business requirements of the company. She is also involved in reviewing her colleague’s pipelines as well as asking for colleagues to review her work as it moves between development and production environments
- Her colleague, the Architect, is an experienced role that is responsible for reviewing pipelines and other asset changes as they move between the organizations. You will see that the Integrator and Architect will play a key role in delivering the integrations to the business. However, several other roles are there to make sure that the integrations are smooth, automated, governed, and tested.
- The Test lead applies the company’s general testing guidelines and policies to the SnapLogic tool and processes. Specifically, he will ensure that Integrators provide testing coverage as unit tests along with created pipelines.
- Similarly, the Security lead governs the company’s data security and quality controls. In our scenario, she provides a set of policies that pipelines need to adhere to.
- In order to have processes automated, the CI/CD engineer uses a set of tools and services to create automated pipelines based on steps in the lifecycle. Specifically, she creates processes that automate unit test checks, quality checks and pipeline promotions between the development and production environments.
- Finally, although SnapLogic provides live schema introspection and validation to help Integrators create stable and predictable pipelines, an error in a production pipeline needs to be caught and alerts need to be generated. The Operations role responds to errors in production and oversees the helpdesk ticket lifecycle – from creation to resolution.
Note: The above roles and responsibilities are provided as a guideline and do not necessarily map to all the SnapLogic customers. For example, few of the above roles will be performed by the same person in an organization.
SnapLogic Pipeline Lifecycle Automation
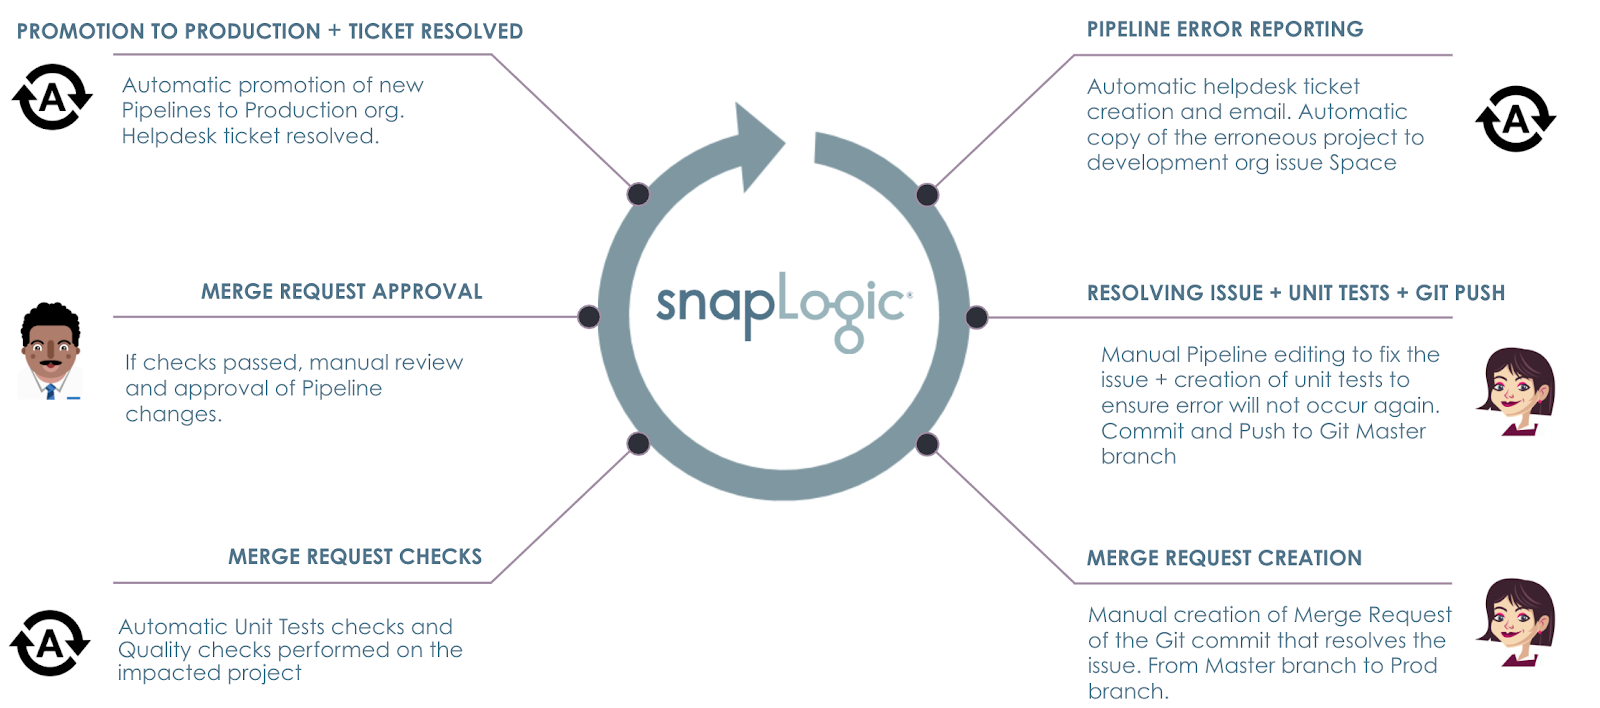
Consider this scenario: An error occurs in one of the production pipelines. The goal is to have automated processes in place to make sure that
- The error is caught and reported using ACME’s helpdesk tool and alerting system, overseen by Operations.
- A copy of the pipeline project can immediately receive the attention of the Integrator to start correcting the issue in the development org.
- Unit tests and quality checks are done before the Architect approves the changes.
- Upon approval, pipelines are automatically promoted to the production org – effectively fixing the error.
- Helpdesk ticket automatically closed upon promotion with an update sent to the Operations.
The steps taken in the ACME scenario are seen below.
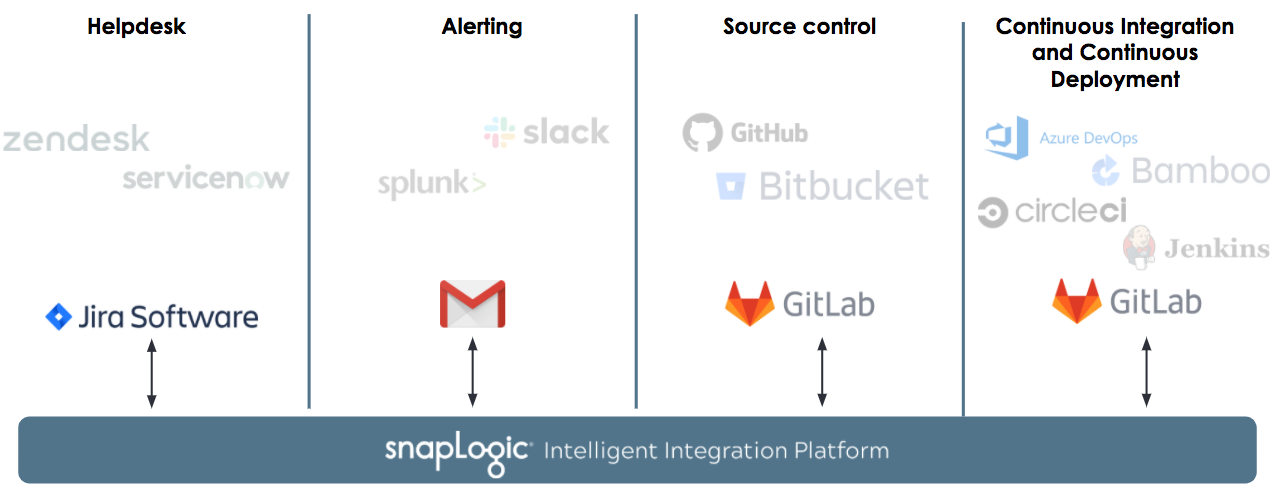
As mentioned in the beginning of this post, customers’ helpdesk systems, error and alerting tools, version control systems and continuous integration tools can vary. SnapLogic works seamlessly regardless of your chosen tool and we don’t have a recommended or default toolchain for this process. For this blog post, the fictional ACME company has selected the below tools.
Pipeline Error Reporting
ACME has a business requirement to migrate their legacy CRM to Salesforce. To do this, CustomerToSalesforce, a SnapLogic pipeline, will receive existing customer records from the legacy CRM through a Triggered Task that exposes a REST API.
- The assets for this integration reside in a project called CRM_MIGRATION in the Production organization.
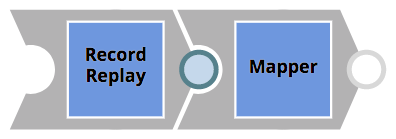
- The customer records passed in the REST call will be mapped to a Salesforce Object. Before the Mapper Snap applies the mapping, a Record Replay Snap is used to save down the incoming object to the file system – that will allow customer data to be investigated afterwards in case of a potential problem. This very simple pipeline is shown below.

The below image shows the configuration of the Mapper Snap. It assumes that the incoming REST call has the following objects in the JSON body: firstName, lastName, company and income. The Salesforce object does not have a firstName or lastName, instead a mapping is created to concatenate the firstName with lastName to a single Name property.
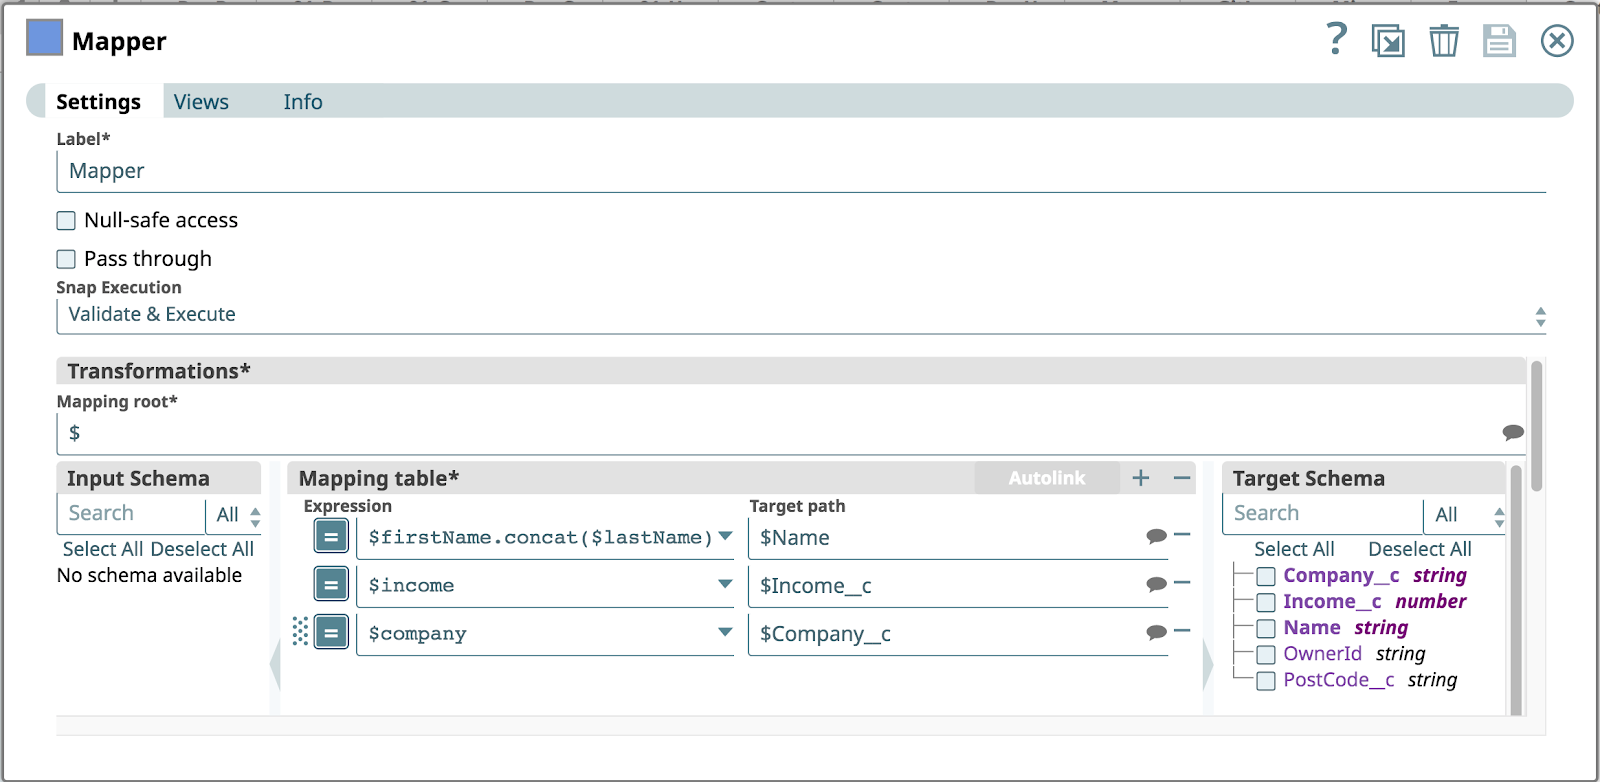
Can you already spot the potential design and data flaws with this Pipeline?
Yes, you got it! The pipeline assumes that legacy CRM provides all the required inputs. As ACME did not set up their processes and controls in time, this pipeline made its way to production without unit tests or quality checks.
Now, unfortunately, the legacy CRM that invokes the REST API passes a customer object that is missing the firstName parameter. As a result the first Expression in the Mapping table will cause an error as the concat operation will fail.
SnapLogic platform provides error pipelines for every Snap to handle such error cases. The following events now take place.
- The error is caught by an error pipeline.
- The error pipeline creates a JIRA ticket and alerts Operations by sending out an email
- The error pipeline copies the impacted project from the production environment to an Issue space in the development environment
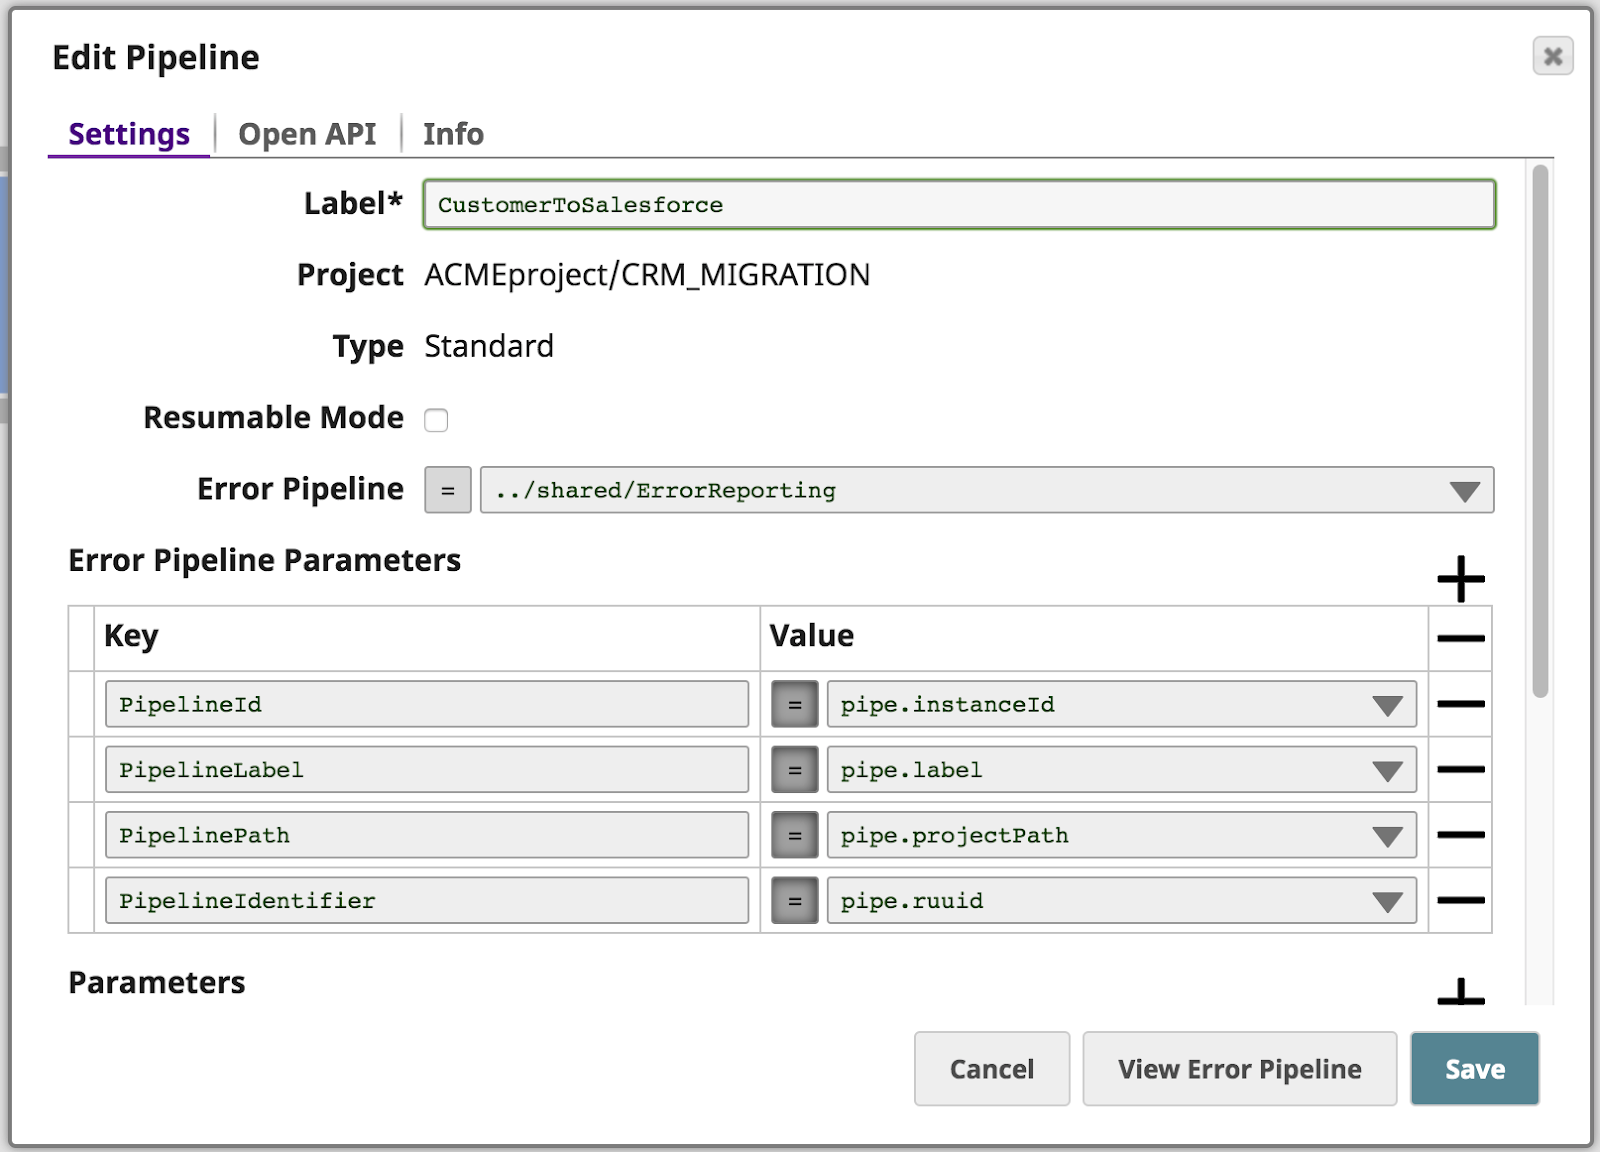
In addition to routing the error that occurred due to the missing firstName parameter, the pipeline passes a couple of pipeline properties as parameters to the error pipeline called ErrorReporting.
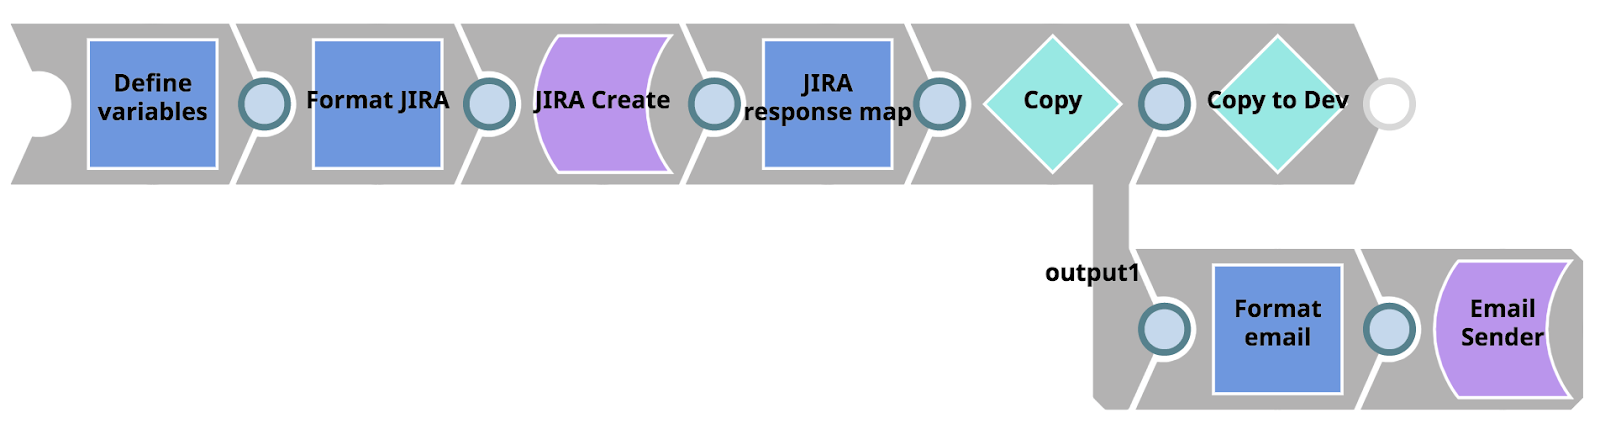
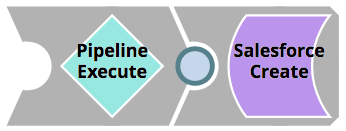
The error pipeline can be seen below. Firstly, it takes error information and Pipeline Parameters and maps them to the JIRA Create Snap. Then, it takes the response from JIRA (specifically the resulting JIRA ticket URL) and passes the document to two branches using the Copy Snap. The upper branch passes the document to another pipeline using the Pipeline Execute Snap. The bottom branch formats the information to an HTML email that is sent out to Operations using the Email Sender Snap.
First, lets focus on the child Pipeline invoked by our Error Pipeline using the Pipeline Execute Snap (labelled as ‘Copy to Dev’). Simply, this Pipeline takes advantage of the Metadata Snap Pack in order to list, retrieve, map and update assets between the project in the production environment and the Issue Space in the development environment. When the Pipeline has finished, exact copies of the project assets where the error occurred will be available for the Integrator to start working on in the development org.
It is important to not try to resolve the issue in the Production org – circumventing any existing processes and checks.

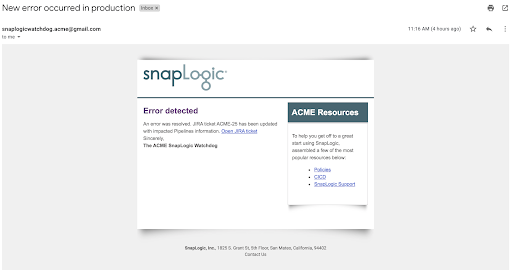
Secondly, lets see the result of the other actions taken by the Error Pipeline. The below image shows the actual email that was automatically sent out to Operations. It mentions some relevant links but most importantly it links to the automatically generated JIRA ticket.
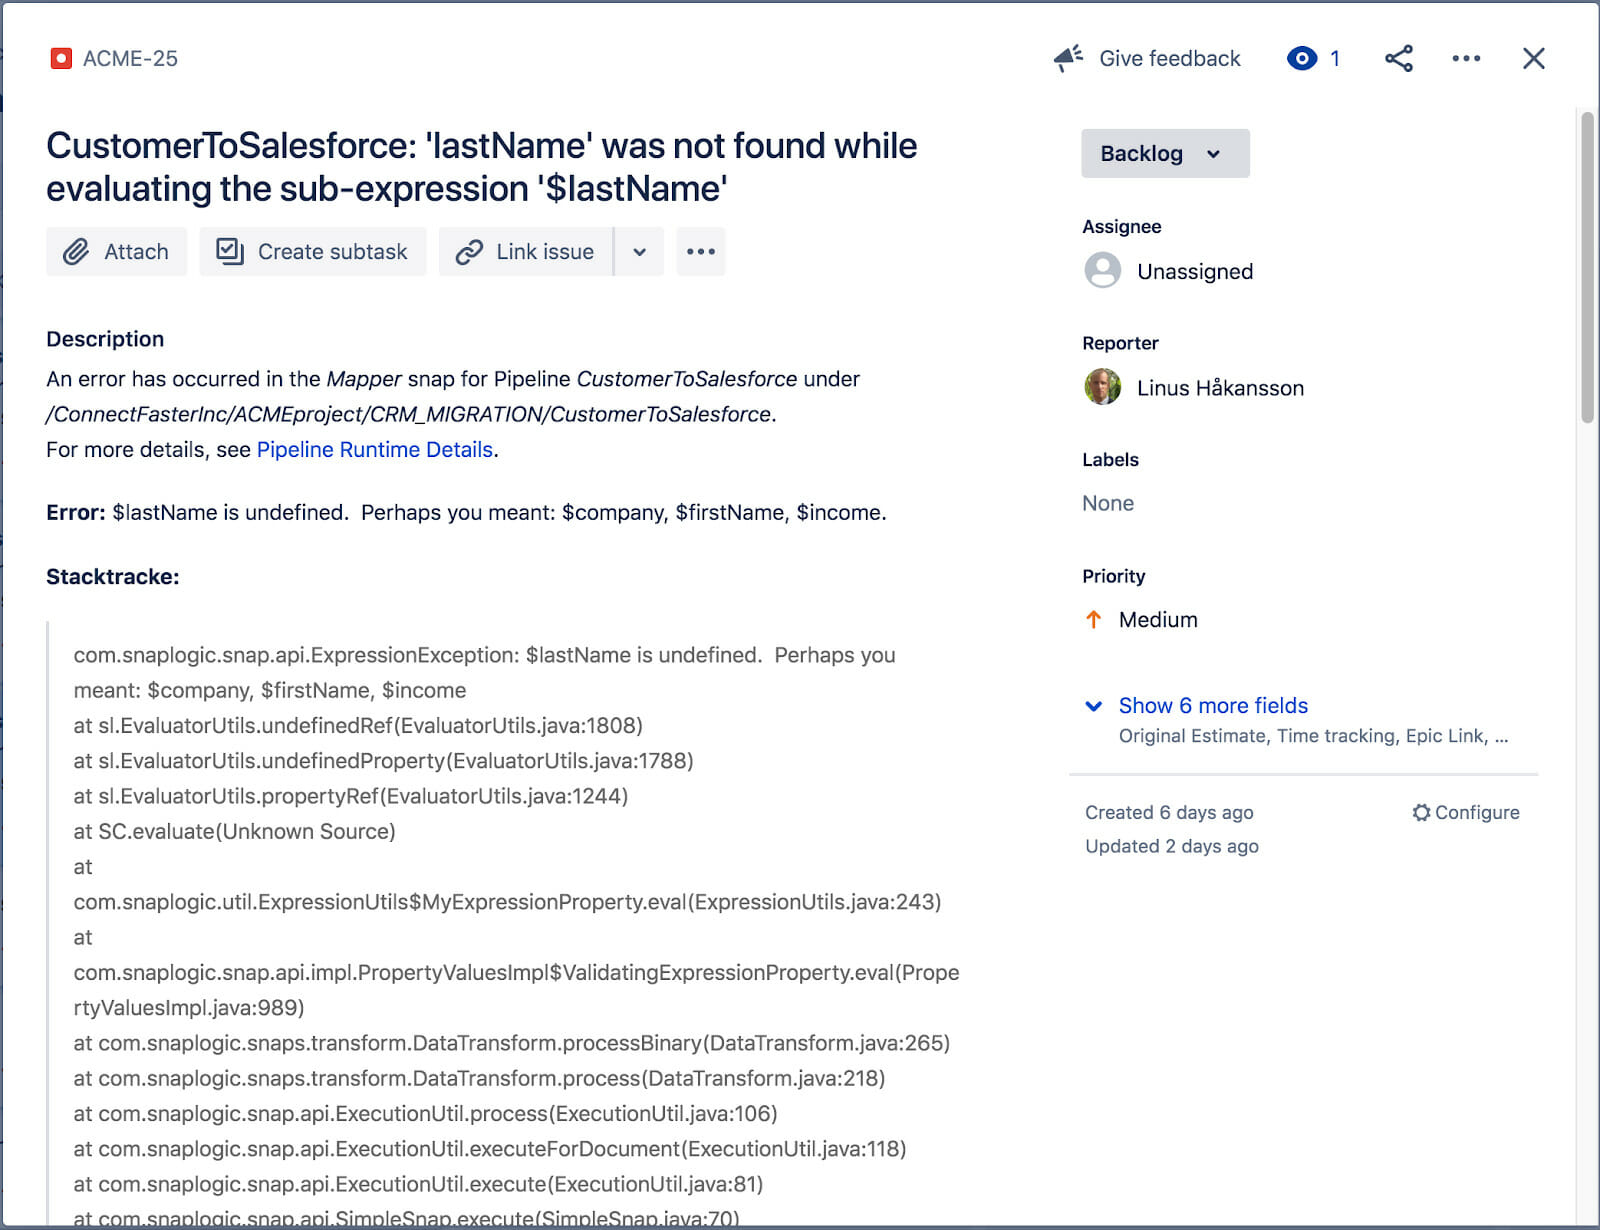
The linked JIRA ticket can be seen below. It includes the error title, description, stacktrace, resolution (not on screen) as well as a link to the actual pipeline execution runtime details where the error occurred. Our Operations and Integrator will now have enough information to start resolving the issue.
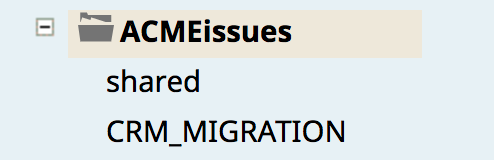
Finally, the image below shows the newly copied CRM_MIGRATION project (that holds the CustomerToSalesforce pipeline and Task) that was copied from the production environment to the development environment’s Issue Space (ACMEissues).
Resolving Issue + Unit Tests + Git Push
Our Integrator is now able to assign herself to the highly prioritized issue and start her work. As she now has proper testing requirements and guidelines by her Test lead, she will also create unit tests to ensure that the error will not happen again. When finished, she will use the ‘Gitlab Push Pipeline’ in order to have a new commit pushed to the Master Git branch.
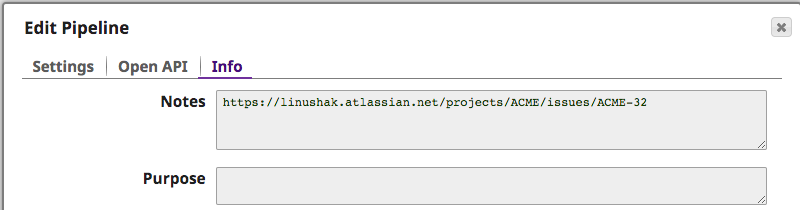
To better understand what error caused the issue, the Integrator can inspect the Notes of the copied pipeline that caused the issue. Automatically, the JIRA ticket has been inserted to provide further information as can be seen below.
The Test lead is recommending the following logic for enabling unit tests for the pipelines.
Break out the logic into a separate Pipeline. This will not only make unit testing easier, but also enable reuse of components. This Pipeline should be called <Pipeline_name>_target. The original Pipeline should now instead have a Pipeline Execute Snap that executes the Pipeline housing the logic.
- Create a pipeline as <Pipeline_name>_test that loads test data and executes the <Pipeline_name>_target Pipeline with that data. It then saves the result into a seperate file.
- The test data should reside in a file as <Pipeline_name>_input.json
- The result data should be written to a file as <Pipeline_name>_result.json

Note: How the tests are actually executed are covered in a later step in this post.
The Integrator adapts her CustomerToSalesforce Pipeline as above and creates the CustomerToSalesforce_target (for the logic) and CustomerToSalesforce_test (for reading and saving input/output data) pipelines. To ensure that the required CRM customer properties exists and effectively fix the error, she adapts the logic pipeline as below
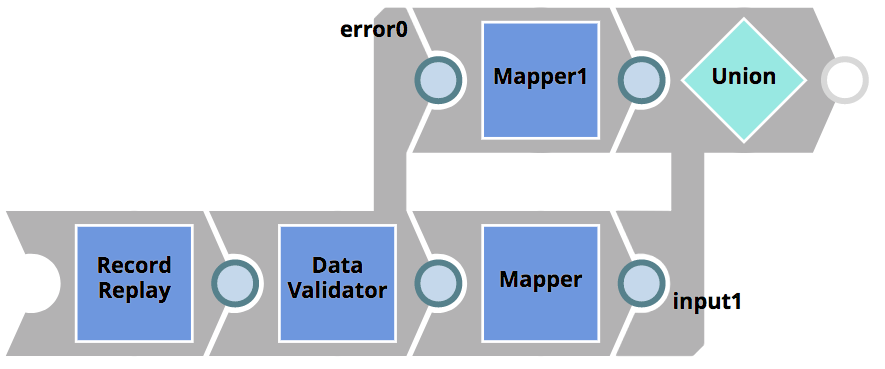
The Data Validator Snap is used to check for the existence of the required properties (i.e firstName and lastName). If the checks do not pass, the document will be routed to the error view before it is passed back to the client. With this logic, the legacy CRM client will have the ability to take action on the error.
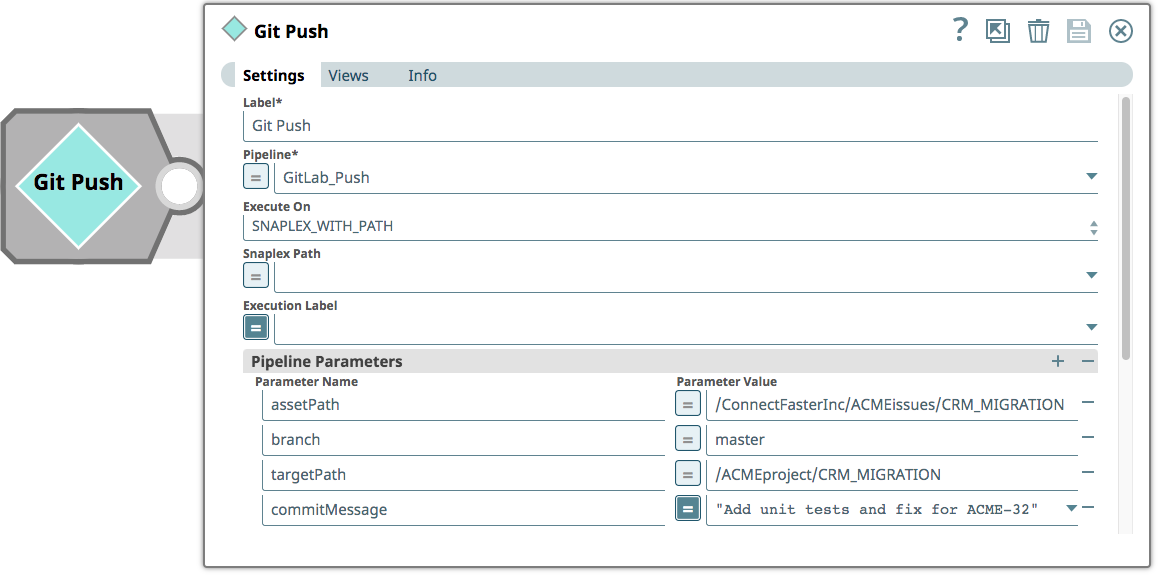
Finally, the Integrator pushes the pipelines to the Master branch of the GitLab repository. The pipeline used to invoke the process of pushing a commit to GitLab consists of a single ‘Pipeline Execute’ Snap that takes parameters for asset path (which project to look for changes in), the branch (in the GitLab repository), a target path (the actual project – the Git repository does not contain references to environments) and a commit message – in this case referencing the JIRA ticket number.
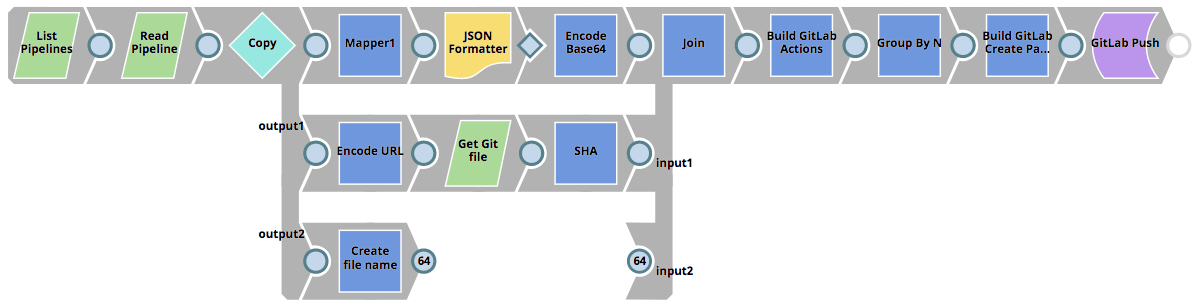
The GitLab_Push Pipeline that is invoked can be seen below. It reads all the Pipelines in the selected project, determines if the Pipelines are to be created in the Git repository or updated (if a SHA exists already) and then pushes a commit to GitLab.
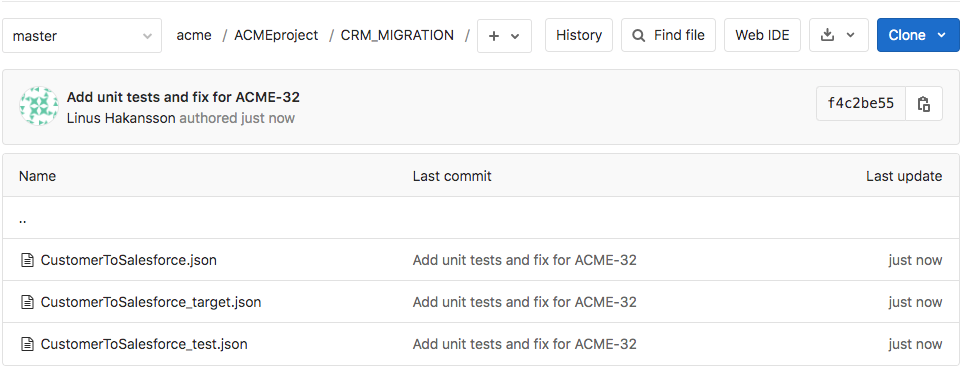
The result of the execution of the GitLab_Push Pipeline is reflected in the GitLab repository as indicated in the picture below. In the picture, the Master branch is currently selected and the file browser is displaying the files in the ACMEproject/CRM_MIGRATION directory. The changes to CustomerToSalesforce Pipeline, as well as the two new unit test pipelines have been added to the repository as part of the commit.
Check out part 2 of this series where you will learn more about best practices around handling the lifecycle of merge requests and promoting changes to the production environment for your integration assets!