


A couple of years ago, I wrote an article, “REST GET and the SnapLogic Public APIs for Pipeline Executions,” which illustrates how to use both the SnapLogic Public APIs for pipeline runtime execution info as well as the iteration feature on REST GET. Just a couple of weeks ago, a colleague asked if there was a SnapLogic Pattern available for this use case. I told them I had never gotten around to it (sigh).
My colleague’s question inspired me to build a SnapLogic Pattern – an integration pipeline template – that leveraged SnapLogic Public APIs and REST GET. So, here goes:
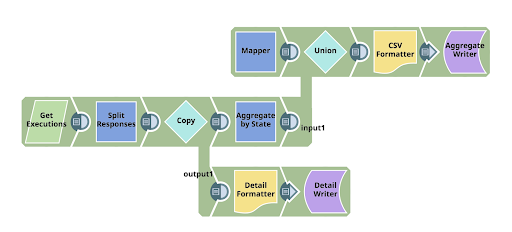
In summary, the pipeline uses the SnapLogic Public APIs to read the summary of executions, then does two things with them; first writes the line detail retrieved into a file, and concurrently, also writes a summary into a file, so you can see what the output contains. Along the way I’m using various techniques:
- Using the iteration feature of the REST Get Snap, so that the multiple iterative requests required to retrieve the detail from the SnapLogic Public APIs are consumed.
- Dynamically configuring the URLs used with the expression language ternary operator
- Using an expression to get the org name (for use in the URLs)
- Putting multiple different format data into a single output stream, with an implication of order
REST Get URL Configuration:
First, let’s look at the way I defined the URL to call:
| ‘https://elastic.snaplogic.com/api/1/rest/public/runtime/’ + pipe.plexPath.split(‘/’)[1] + ‘?level=summary’ + (_state == null || _state ==”” ? ” : ‘&state=’+ _state) + (_hours == null || _hours ==”” ? ” : ‘&last_hours=’+ _hours) + (_batchsize == null || _batchsize ==”” ? ” : ‘&limit=’+ _batchsize) |
It looks like a bit of a complex expression, but let’s break it down:
The core API is located at
https://elastic.snaplogic.com/api/1/rest/public/runtime/.
After locating the core API, we need to specify the organization name. To make the name dynamic and able to work in any org, I used an expression to extract the org from the only place I could find available in the path of the Snaplex being used. The expression:
pipe.plexPath.split(‘/’)[1]
captures the first element of the Snaplex path, which is the org name.
The next set of expressions in there gauges the state of the pipeline parameters and configures the options for the API request – the set of states required, how many hours to retrieve, and the batch size to use. Conditionally, we either: 1) configure each parameter based on whether it is empty or null (in which case, I don’t need to pass in a value); 2) pass in the configured value which will be picked up from parameters passed to the pipeline; or, 3) use the defaults defined in the pipeline’s properties.
The “Has Next” Configuration
The “Has Next” field is how we decide if, after the first retrieve, we must go through more iterations to get the whole set. A Boolean expression should determine this. In this case, in the first request response, SnapLogic provides data about what is available: the total number available, the offset, and the limit (the limit corresponds to the number in the batch). I then check the sum of what I already have and the number available, giving me a Boolean result.
| $entity.response_map.offset + $entity.response_map.limit < $entity.response_map.total |
The “Next URL”
This URL could be similar to the first, but we have to additionally tell it where to start retrieving from (highlighted in the code below):
| ‘https://elastic.snaplogic.com/api/1/rest/public/runtime/’ + pipe.plexPath.split(‘/’)[1] + ‘?level=summary’ + (_state == null || _state ==”” ? ” : ‘&state=’+ _state) + (_hours == null || _hours ==”” ? ” : ‘&last_hours=’+ _hours) + ‘&offset=’ + ($entity.response_map.offset+$entity.response_map.limit) + (_batchsize == null || _batchsize ==”” ? ” : ‘&limit=’+ _batchsize) |
Put multiple different format data into a single output stream with an implication of order
The other technique I used in this pipeline was a construct that allowed me to write the summary output file using two streams of data. This technique enabled me to get the data into the file the way I wanted.
First, I have the Mapper Snap, which, on pipeline execution, does not wait for any input and thus immediately outputs a single document. I created an expression to capture the execution parameters and format them into a string:
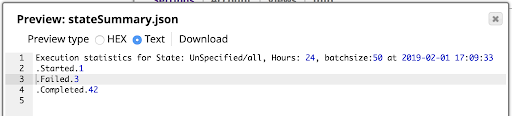
| “Execution statistics for State: ” + ( _state == null || _state ==”” ? ‘UnSpecified/all’ : _state) + “, Hours: ” + ( _hours == null || _hours ==”” ? ‘UnSpecified/1 Hr’ : _hours) + “, batchsize:” + ( _batchsize == null || _batchsize ==”” ? ‘UnSpecified/10’ : _batchsize) + ” at ” + Date.now().toLocaleDateTimeString(‘{“format”:”yyyy-MM-dd HH:mm:ss”}’) |
Again, I tried to get the data formatted into a reasonable format so that when viewed using the field viewer, you can readily see the results and the configuration that gave that result.
The Mapper’s output is highly likely to be the first document into the Union Snap which follows it, so it is always the first part of the data stream written to the output file.
When the REST GET has done its stuff, the Aggregate Snap aggregates the count of executions in each state, which we then pass into the file.
The result is the Summary Information shown below, viewed using the preview on the File Writer:
Don’t forget that the REST GET Snap will need a REST Basic Auth account with valid credentials to make the request to the platform. The result will only include the results for those executions which those credentials have the authority to see. Use an Admin-type account if you want to see all executions in an org.
If you’d like to try the SnapLogic pipeline featured in this blog post, you can download it in the SnapLogic Community.